2023腾讯安全大赛-android客户端初赛
最终目的:编写注册机,实现输入任意token,都可计算出激活外挂的码
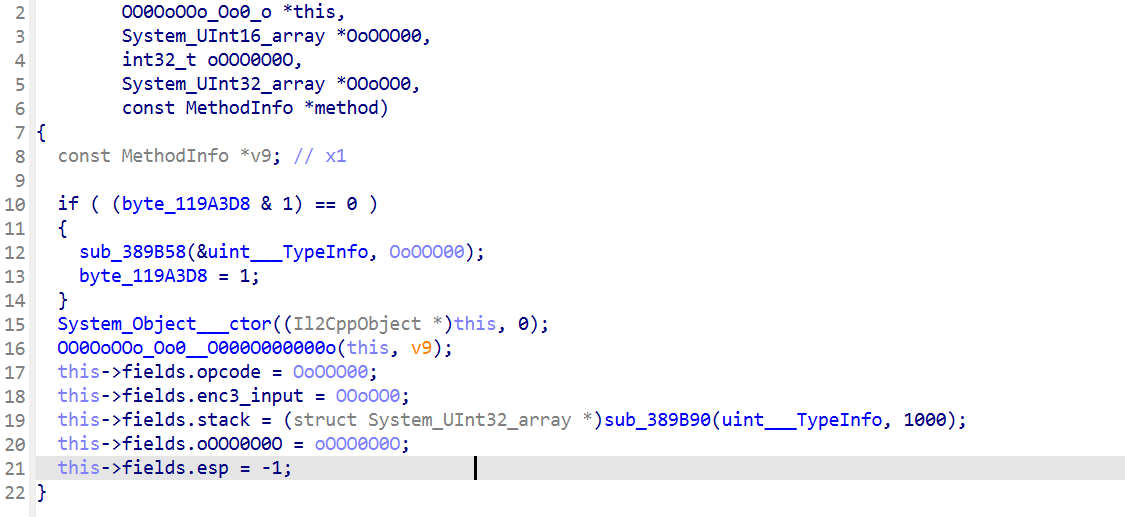
单机游戏:单机游戏是指游戏运行和核心玩法不依赖网络服务器,玩家可在本地独立完成游戏内容的游戏类型
GitHub - yagyiqing/-storehouse: 收集项目源码
环境: 1.pixel3,arm64
2.win11
工具:
ida 9.2/7.7
jadx -1.5.3
il2cppDumper
GAMBA-main
010editor
jeb5.1
一个好的工具可以简化很多工作量
开始逆思路: 拿到 apk文件后,push到手机端,在电脑端解压并打开lib文件夹找切入点
解压后的文件夹中观察到有 libil2cpp.so 文件,这是 unity 游戏使用 IL2CPP 编译方式很明显的标志,游戏的核心算法几乎都在lib2cpp.so文件中
使用IL2CPP(所有 C# 源代码 → IL → C++ → 编译成 lib2cpp.so)的unity游戏一般还伴随着 global-metadata.dat 元数据文件(一般在:assets\bin\Data\Managed\Metadata),元数据文件中包含方法名,类名,字段名等信息,但它是二进制文件不能直接打开
所以先借助 il2cppDumper 工具 提取出想要的信息
原始的 c# 代码已经不在游戏里了,IL2CppDumper 做的就是 从libil2cpp.so中把类型,字段,方法名,方法参数等提取出来,再组合成一个dump.cs文件
使用方法:
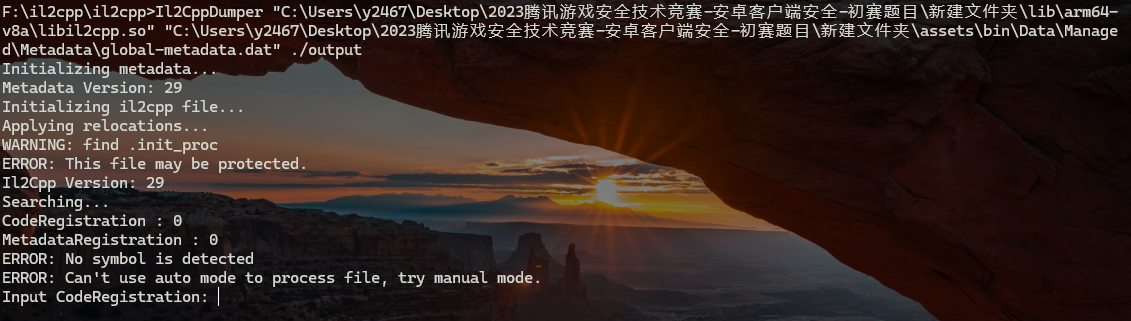
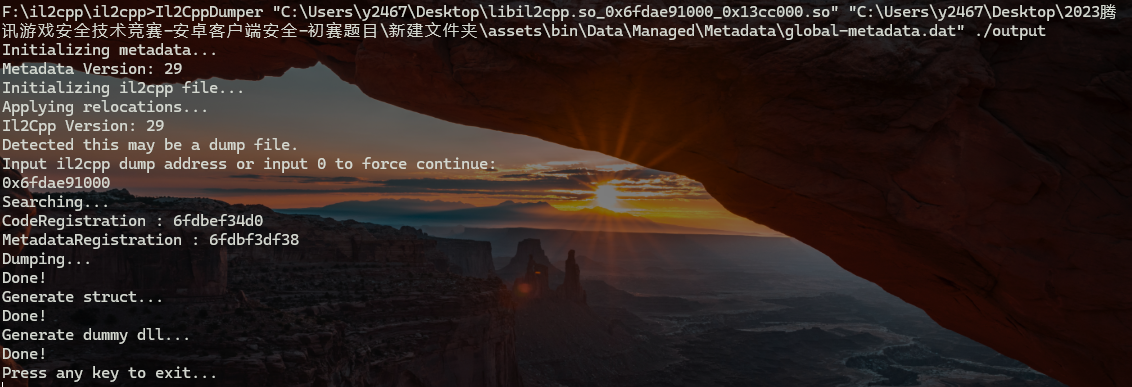
1 2 3 4 完整参数格式 Il2CppDumper.exe <executable-file> <global-metadata> <output-directory>> Il2CppDumper libil2cpp.so global-metadata.dat ./output
发现失败了,打开 global-metadata.dat 文件,发现并没有被加密
那就是 libil2cpp.so文件被加密
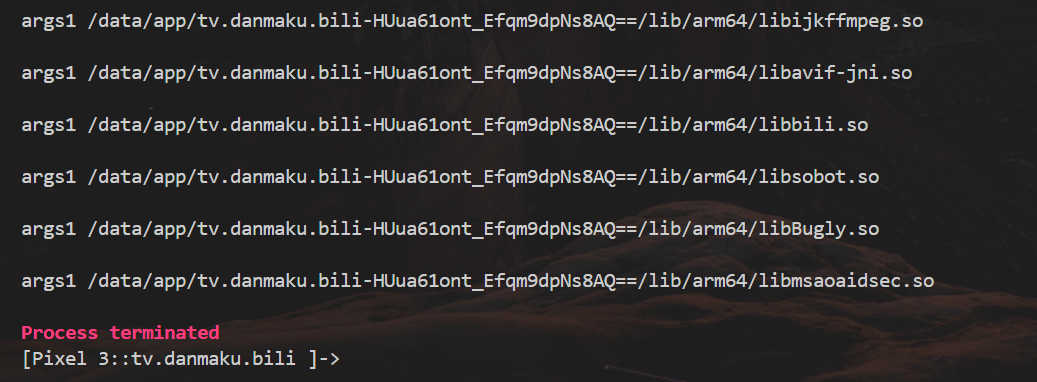
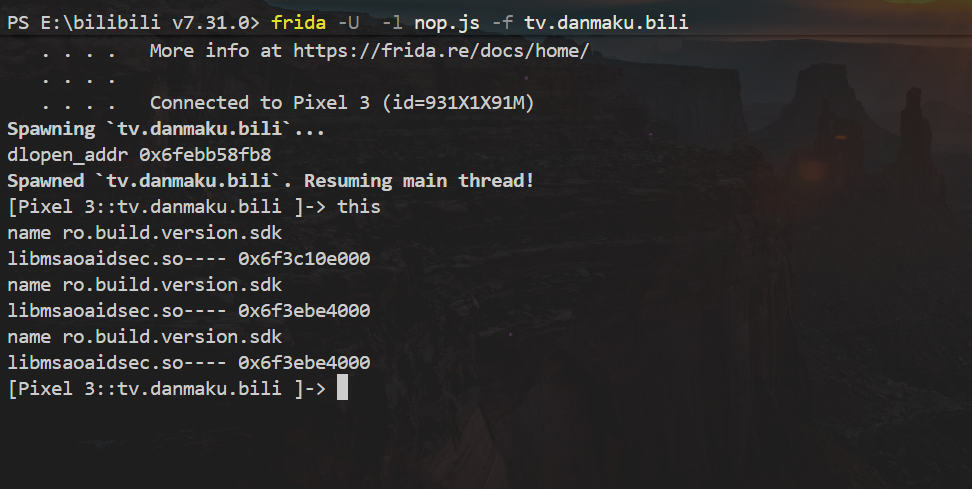
dump 解密状态的 libil2cpp.so 文件 so 文件在运行的时候肯定是解密的状态,所以使用 frida 动态 dump 内存中的 so 文件
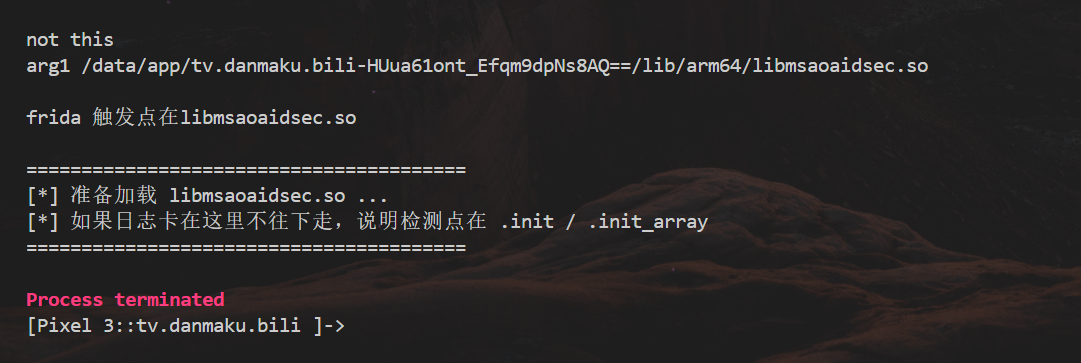
但是直接注入frida 会提示 hack detect ,然后就退出了
应该是有 frida 检测
去一下 frida 的特征
1 2 3 4 5 6 7 8 9 10 11 12 13 修改frida-server的名称 rm frida-server fs 修改端口: ./fs -l 0.0.0.0:1234 -l: listen 0.0.0.0:监听所有网络接口 端口转发: adb forward tcp:1234 tcp:1234 在PC上访问 127.0.0.1:1234 会被转发到Android设备上的127.0.0.1:1234 脚本注入: frida -H 127.0.0.1:1234 -l test1.js -F -H 指定远程(或本地)frida-server 的地址/端口
再注入就不会提示 hack detect 了
dump脚本如下:
把进程内存中已加载的 .so 模块整段读取出来,然以写到文件中,dump 出来
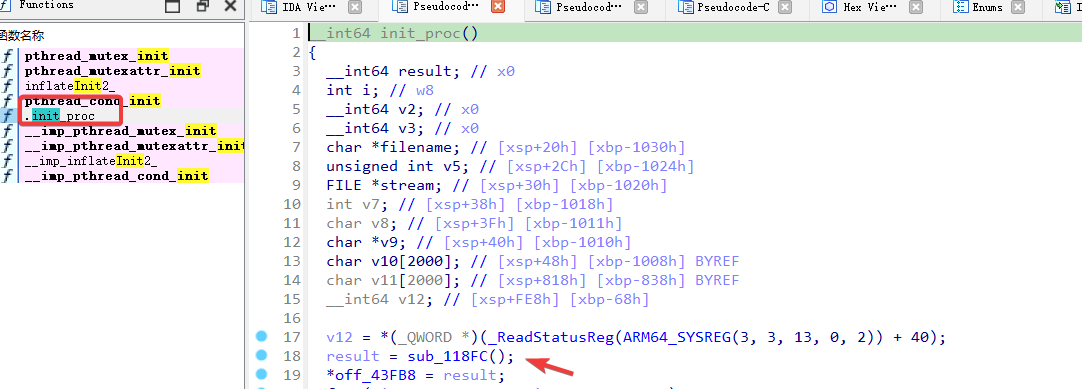
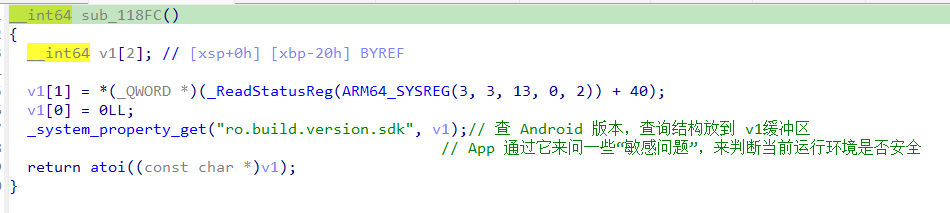
在 Android 应用里有一个顶层对象 是 Application:它代表整个应用程序的全局状态,系统启动应用时,会先创建一个Application 实例,然后再创建具体的 Activity, Service等
1 2 3 4 5 6 7 8 9 10 11 12 13 14 15 16 17 18 19 20 21 22 23 24 25 26 27 28 29 30 31 32 33 34 35 36 37 38 39 40 41 42 43 44 45 46 47 48 49 50 51 52 53 54 55 56 57 58 59 60 61 62 63 64 65 66 67 68 69 70 71 72 73 74 75 76 77 function dump_so(so_name){ Java.perform(function(){ // 拿到当前应用程序的Application对象 var currentApplication = Java.use("android.app.ActivityThread").currentApplication(); if(currentApplication ==null){ console.log("Application还没有初始化成功,请稍等...") setTimeout(tryAgain,1000); } else{ var dir = currentApplication.getApplicationContext().getFilesDir().getPath();} // 拿到全局Context,获取文件路径 function tryAgain(){ var currentApplication2 = Java.use("android.app.ActivityThread").currentApplication(); if(currentApplication2 ==null){ console.log("Application还没有初始化成功,请稍等...") setTimeout(tryAgain,1000); } else{var dir = currentApplication2.getApplicationContext().getFilesDir().getPath();} } // 获取指定模块信息 var libso = Process.getModuleByName(so_name); console.log("[name]:", libso.name); console.log("[base]:", libso.base); console.log("[size]:", ptr(libso.size)); console.log("[path]:", libso.path); var file_path = dir + "/" + libso.name + "_" + libso.base + "_" + ptr(libso.size) + ".so"; var file_handle = new File(file_path, "wb"); if(file_handle && file_handle != null){ // 修改指定内存区域的保护属性 Memory.protect(ptr(libso.base), libso.size, 'rwx'); // 读取字节数组 var libso_buffer = ptr(libso.base).readByteArray(libso.size); file_handle.write(libso_buffer); file_handle.flush(); file_handle.close(); console.log("[dump]:", file_path); } }); } dump_so("libil2cpp.so");
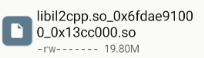
直接移动提示没有权限,所以直接复制到 /data/local/tmp
1 2 3 cp /data/user/0/com.com.sec2023.rocketmouse.mouse/files/libil2cpp.so_0x6fdae91000_0x13cc000.so /data/local/tmp chmod 777 libil2cpp.so_0x6fdae91000_0x13cc000.so adb pull /data/local/tmp/libil2cpp.so_0x6fdae91000_0x13cc000.so "C:\Users\y2467\Desktop\"
再使用 il2cppDumper 工具
成功!
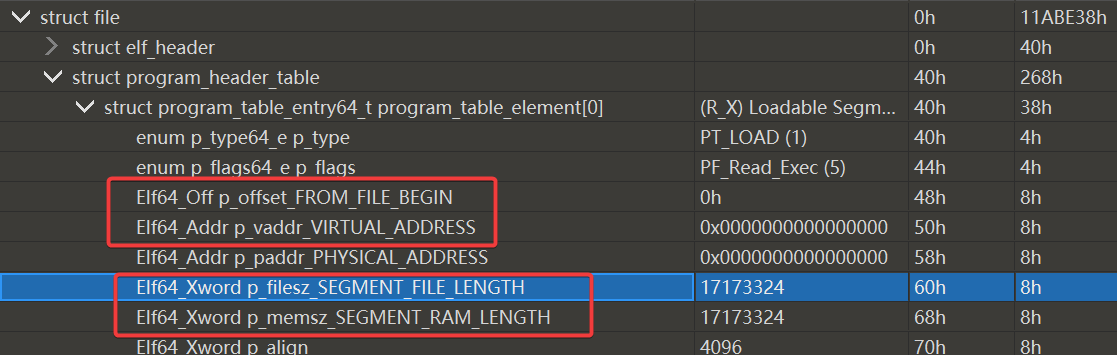
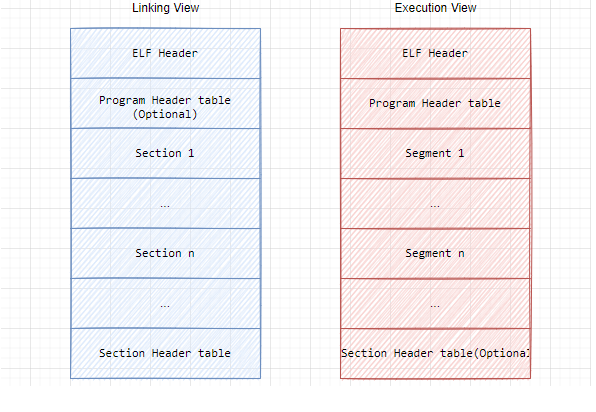
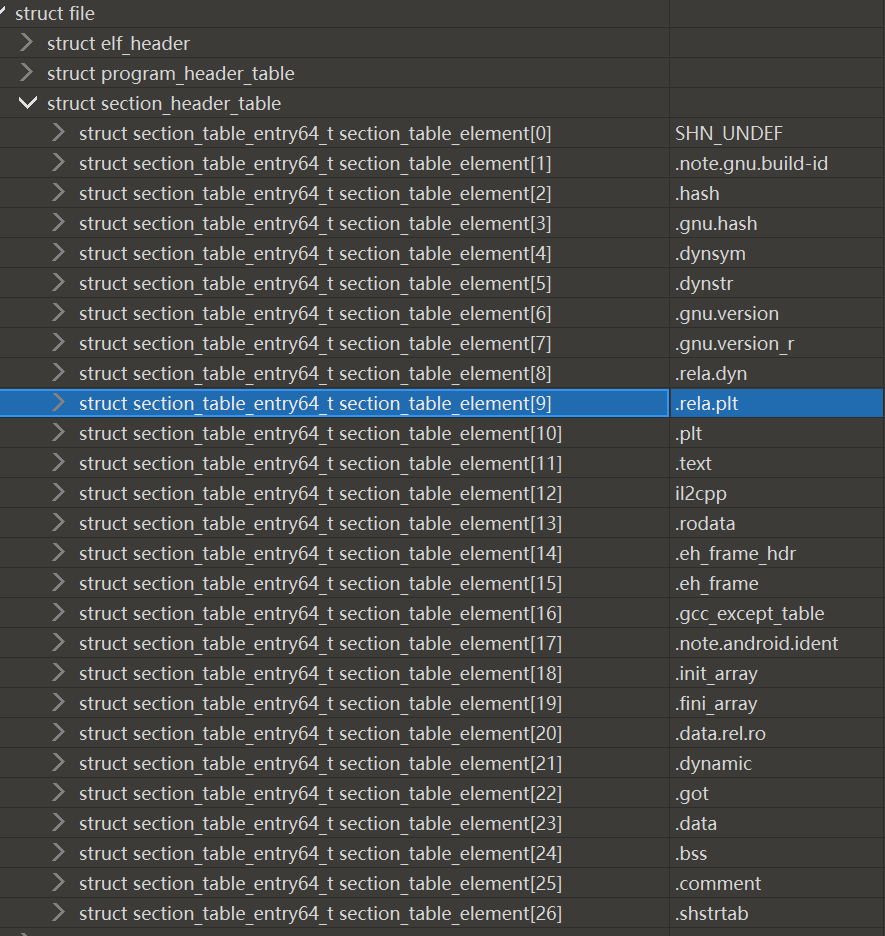
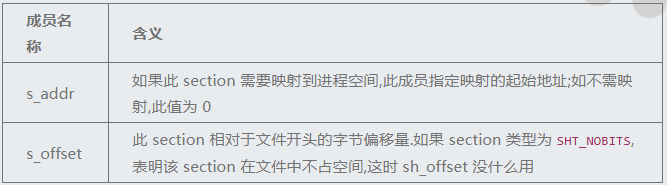
修复 dump 下来的 so 文件 对于dump下来的so文件,所有段和节的偏移都是在运行内存中的偏移,dump 下来的只是一个平铺的内存镜像,对于静态分析来说不是一个合法的 elf 文件,所以需要修复 Segment 偏移和大小 / Section 头的偏移 / Section的内容和名称 / Section的偏移和大小,以便ELF 文件分析器 (ida)可以找到相关的段和节
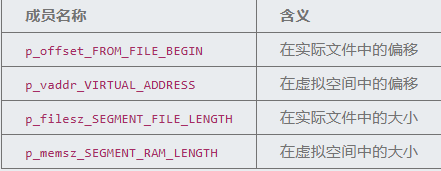
修正段(Segment)的偏移: 段的位置和大小由程序头表中的这四个元素决定
故需要将 program_header 中每一个元素的
p_vaddr_VIRTUAL_ADDRESS 复制给 p_offset_FROM_FILE_BEGIN
p_memsz_SEGMENT_RAM_LENGTH 复制给 p_filesz_SEGMENT_FILE_LENGTH
修正 节表头的偏移: 节表头的位置在最后一个段(segment)之后
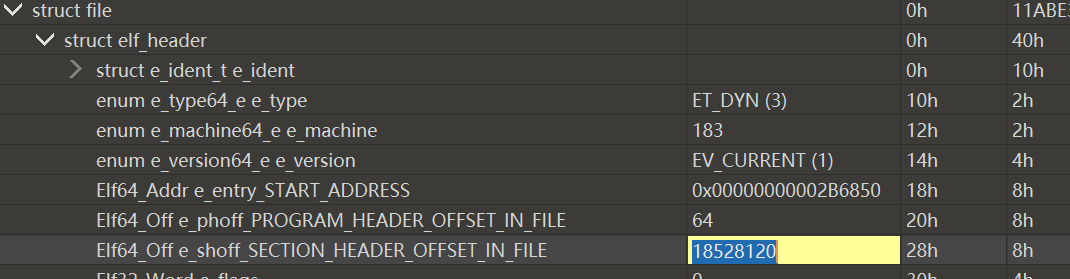
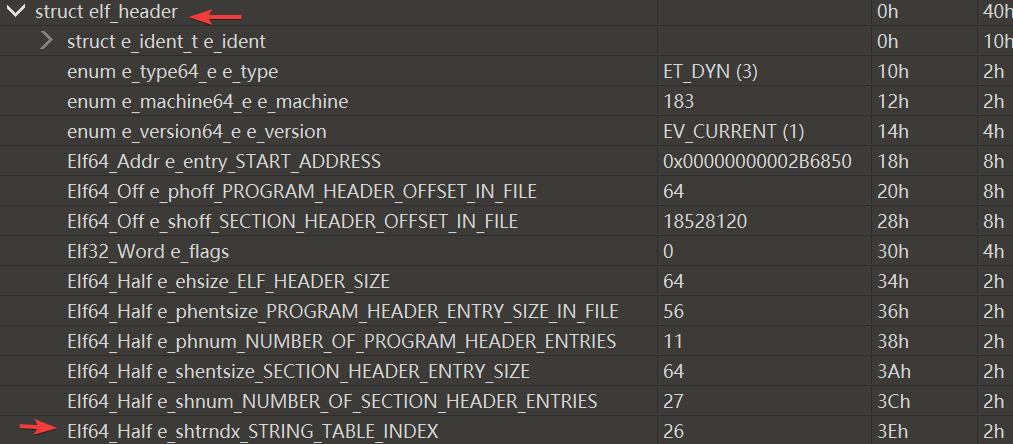
ELF头中的Elf64_Off e_shoff_SECTION_HEADER_OFFSET_IN_FILE字段表示 Section Header 在文件中的偏移
修改前是:0x11AB778
要修改成在运行内存中的偏移,计算过程如下:
Program_Header 中的最后一个元素的
偏移 + 文件大小 = p_vaddr_VIRTUAL_ADDRESS + p_memsz_SEGMENT_RAM_LENGTH =0x00000000013BC000 + 0xF778 = 0x13CB778
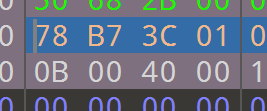
补充Section 头的内容: 因为Android 的Linker 在加载so文件时只需要 Program Header ,不会加载 Section 头的内容,所以dump下来的so中section头是空的
从libil2cpp.so 中复制 节的内容到dump下来的so 中,复制后需要按下F5重新运行一下 模板 ELF.bt
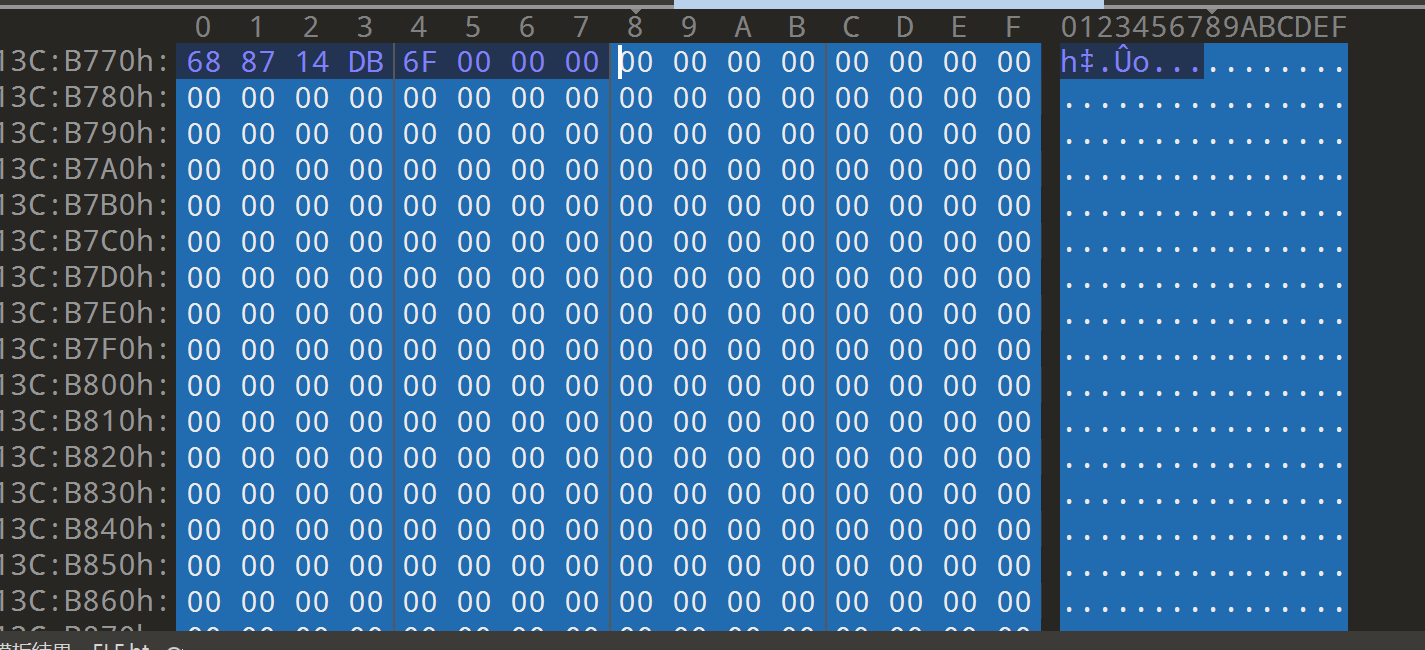
恢复节的名称: 修补内容后,Section的名称还是乱码
ELF 文件中每个Section 都是有名字的,比如 .data .text等,每个名字都是一个字符串,既然是字符串就需要一个字符串池来保存,而这个字符串池也是一个Section(保存了其他Section以及它自己的名字),这个特殊的Section 叫做 .shatrtab
所有section的头部是连续放在一块的,类似于一个数组,Elf64_Half e_shtrndx_STRING_TABLE_INDEX 变量就是 节(.shatrtab) 在这个数组中的下标
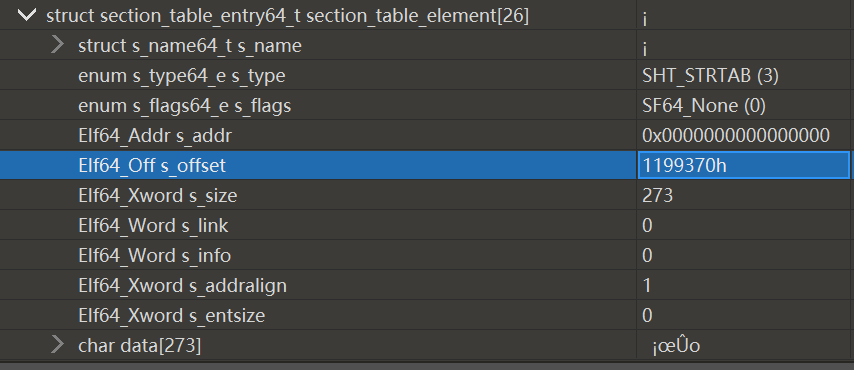
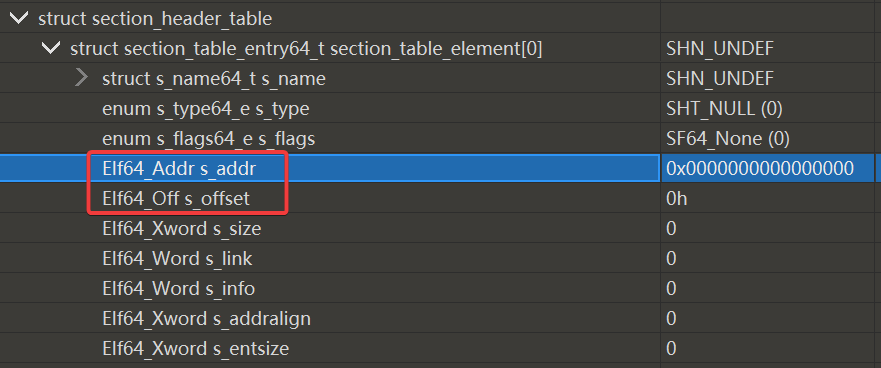
定位到struct section_table_entry64_t section_table_element[26] 中的 Elf64_Off s_offset
Elf64_Offs_offset的值决定了 section 的名称将从哪里去索引
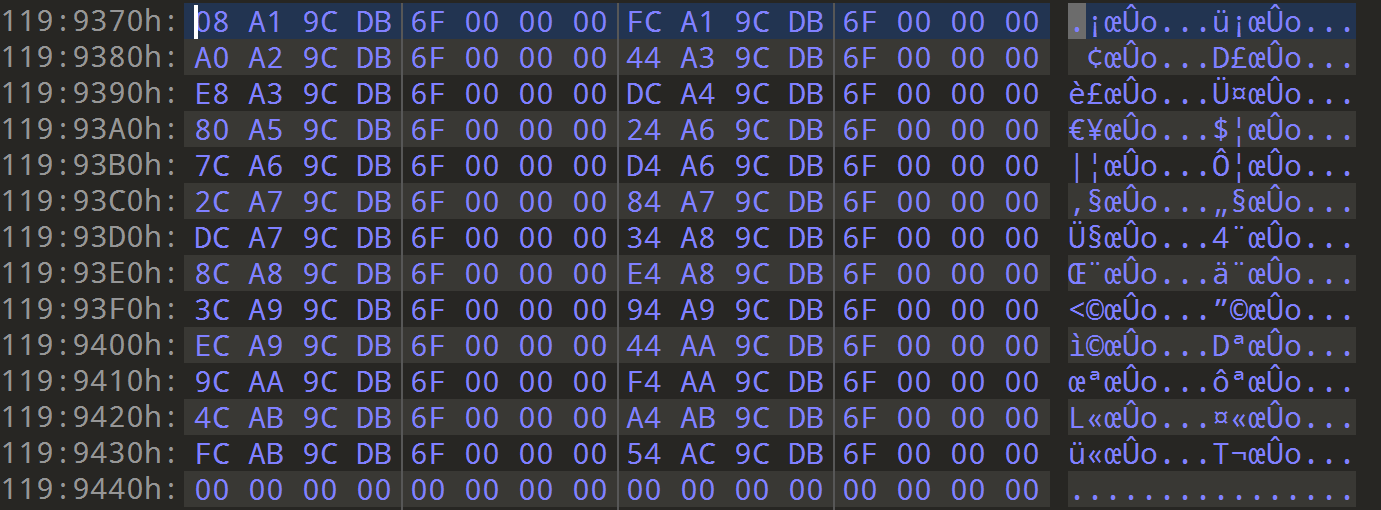
右击该数值,点击转到,会发现是乱码
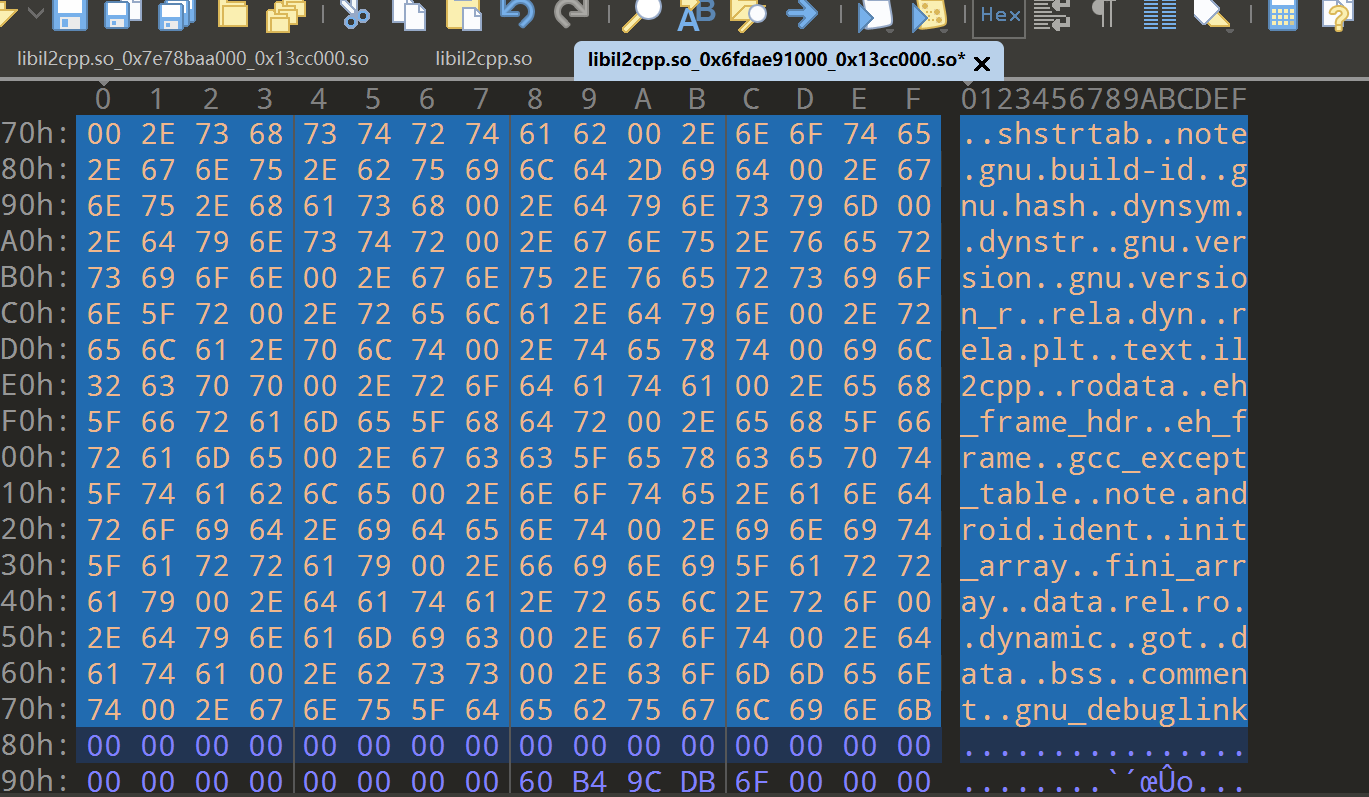
回到dump前的so,同样转到这个位置,发现是明文,直接复制过去,F5更新
段的名称正确显示
修正节的偏移 节的位置和大小由节头表中的两个字段决定
所以如果 s_addr = 0,无需修改s_offset
如果s_addr ≠ 0,将s_addr 的值复制给 s_offset
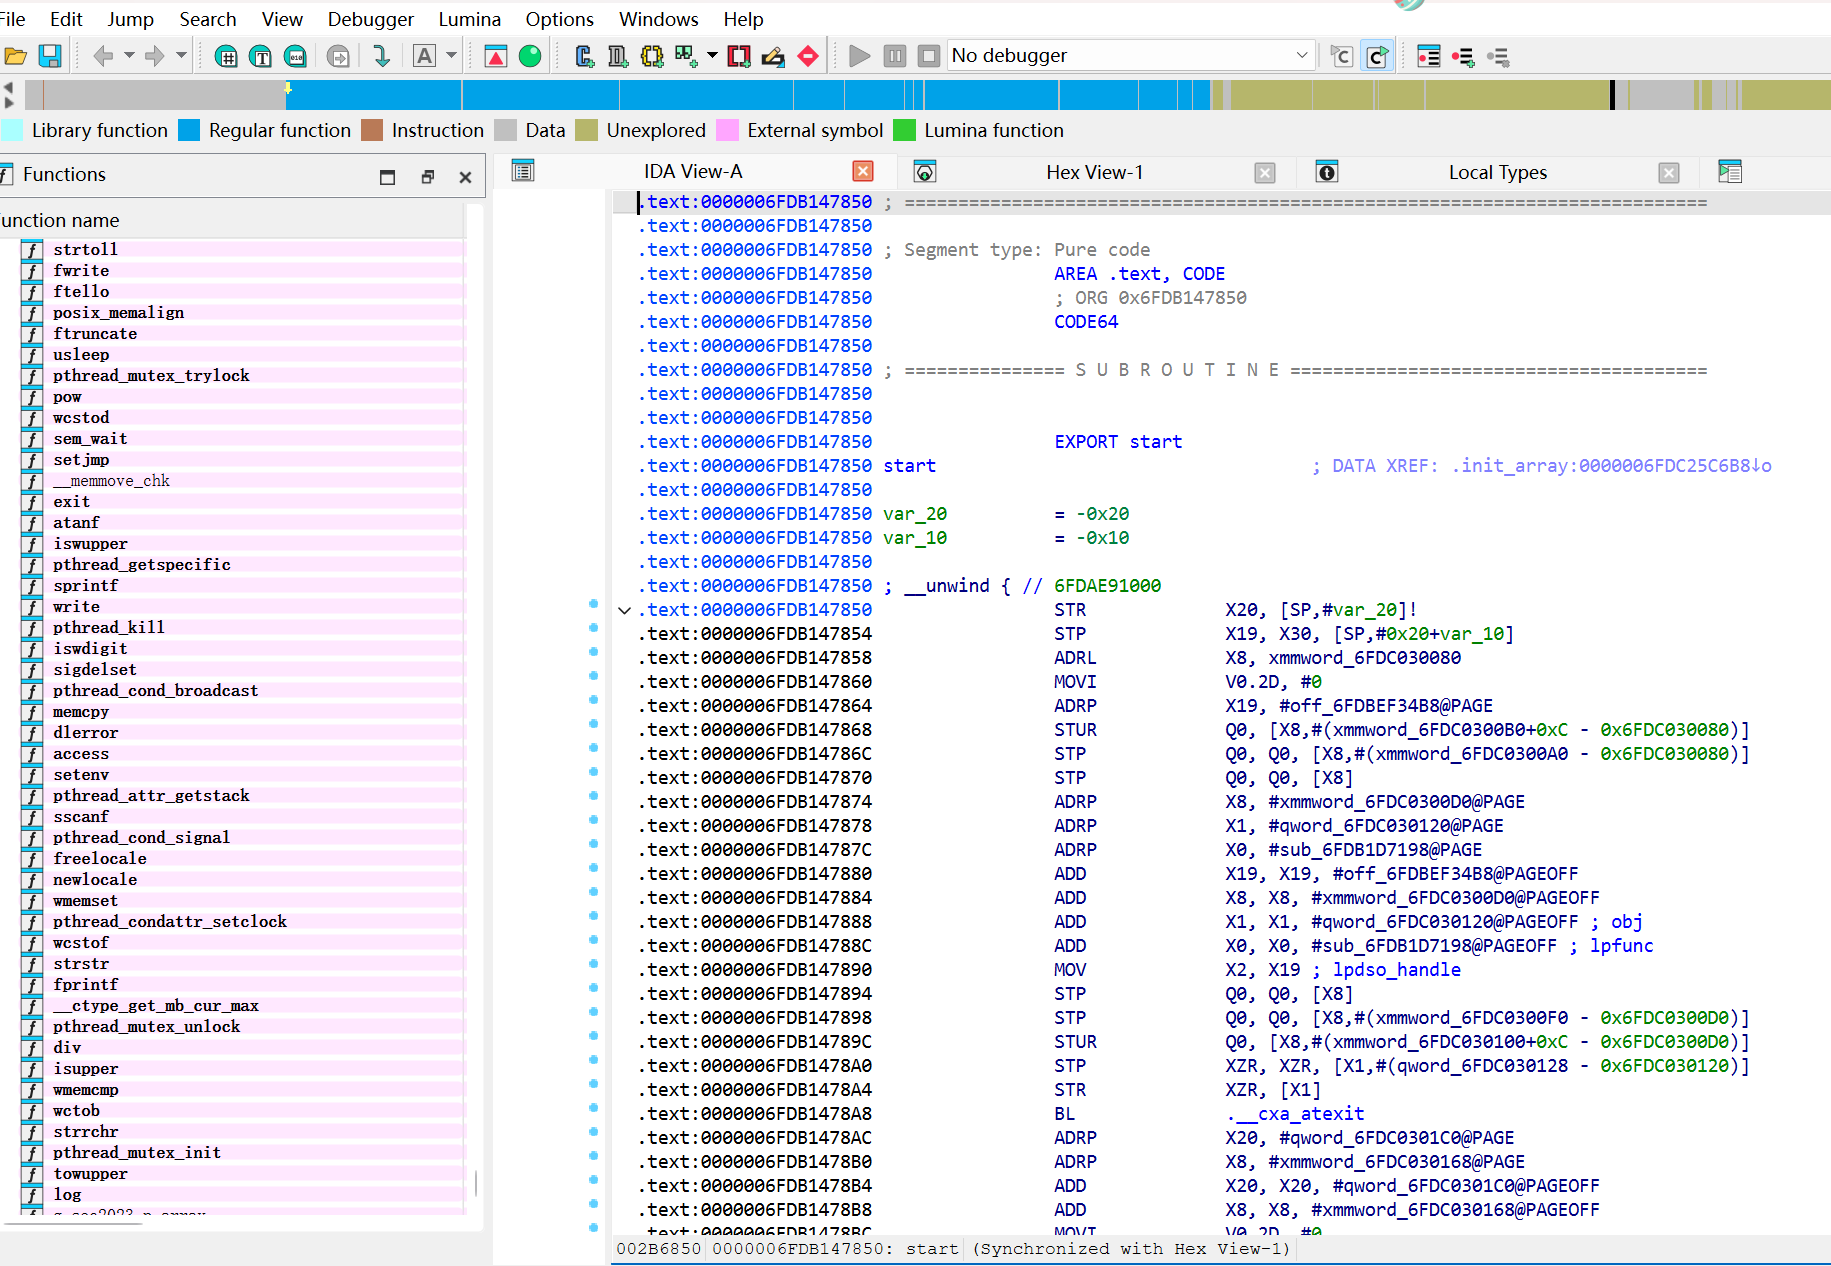
将修复好的 libil2cpp.so_0x6fdae91000_0x13cc000.so 拖入IDA
分析完如下图:
之后,点击 File->Script file… 运行 il2cppdumper 中的 ida_with_struct_py3.py ,选择 script.json,选择 il2cpp.h
等待分析完成…第一次运行等待的时间会久一点
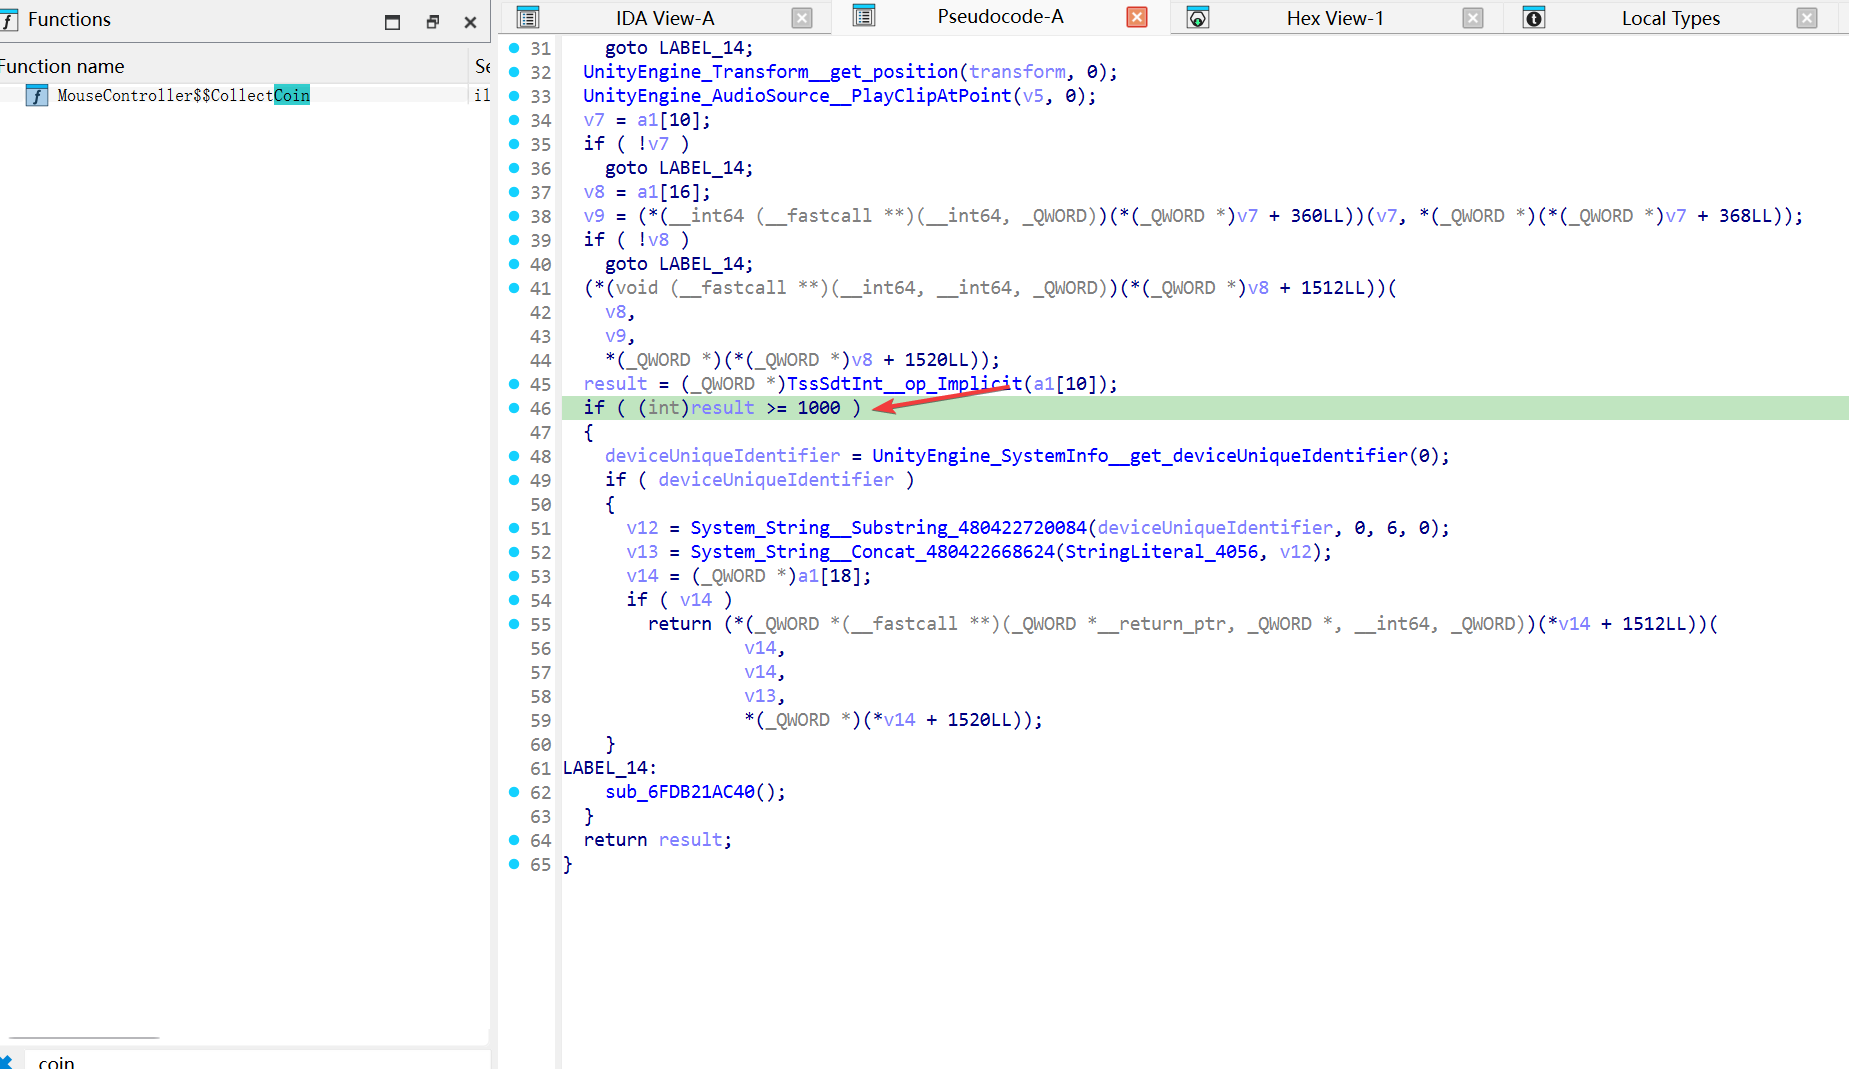
根据 coin 找切入点 unity 使用的不是原生的 UI,所以setOnClickListener监听不到按钮
随便翻翻 dump.cs 文件,搜索 coin 字符串,可以看到 有CollentCoin方法,转去ida中搜索一下,果然搜到了
切换到 汇编试图
很明显,是获取flag的逻辑判断
使用frida patch一下,将1000换成0
1 2 3 4 5 6 7 8 9 function flag(){ var moudle = Process.getModuleByName("libil2cpp.so"); //IDA定位数值偏移地址:右击数据 -> 同步到IDA View-A var cmp = moudle.base.add(0x4653CC) console.log("patch--"); Memory.protect(cmp,4,"rwx"); cmp.writeByteArray([0x1F,0x00,0x00,0x71]) } flag();
随便吃几个金币,就可以获取flag
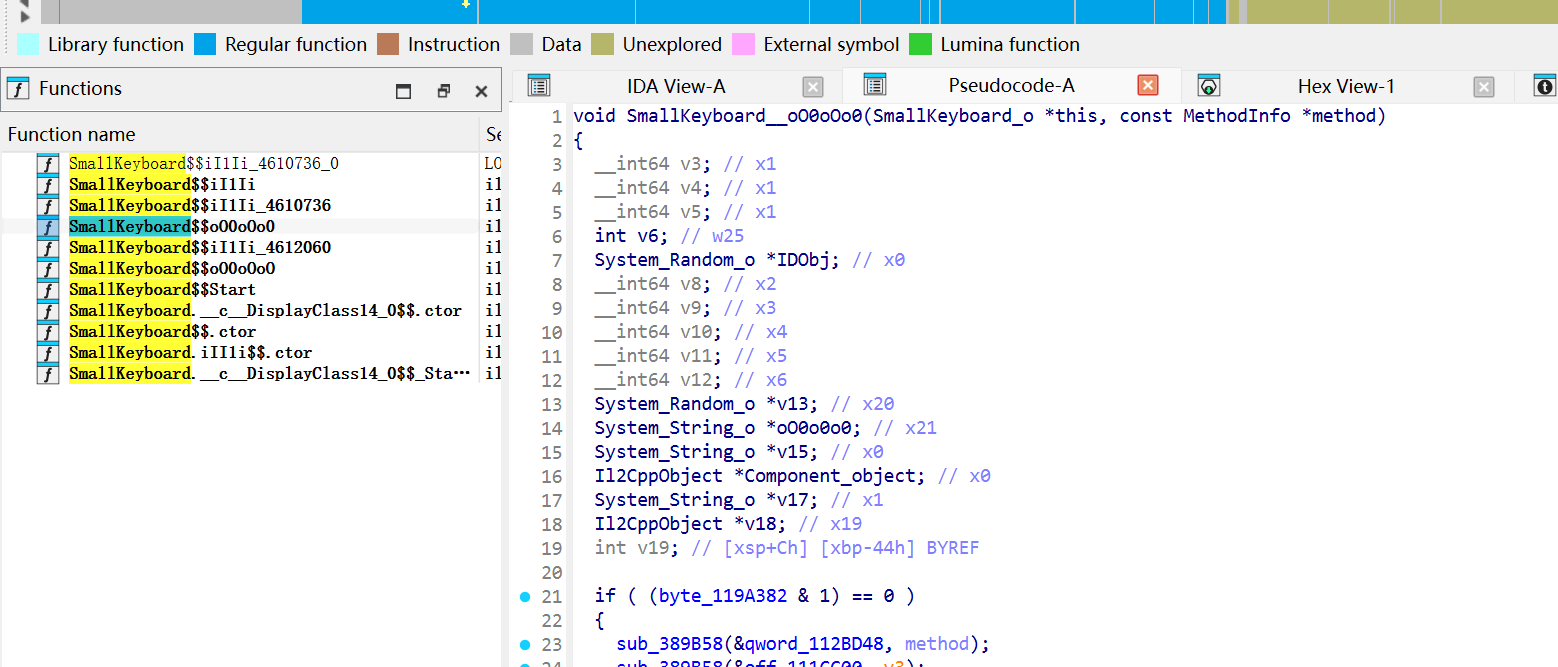
再回到 dump.cs 文件随外下翻翻,看到有一个 SamllKeyboard.KeyboardType枚举类
不同的操作数对应不同的变量
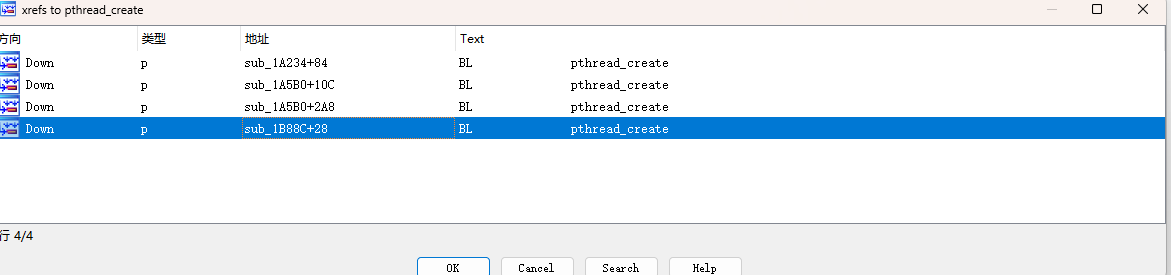
转到ida中搜索一下SamllKeyboard
点开函数看看,注意到 SmallKeyboard__oO0oOo0 ,真是此地无银三百两
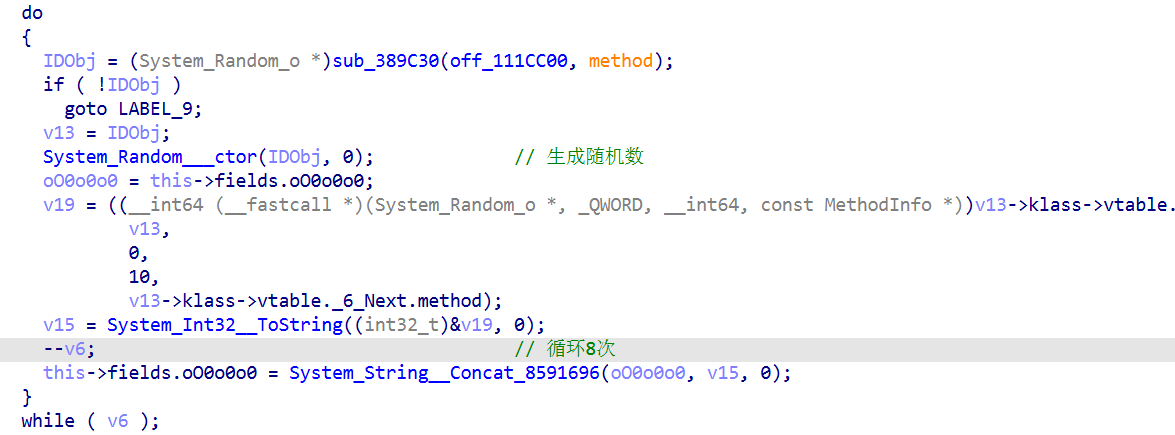
SmallKeyboard__oO0oOo0 中有随机数生成函数 并且 循环8次
小键盘处token的长度也是8,并且每次打开的数值不同
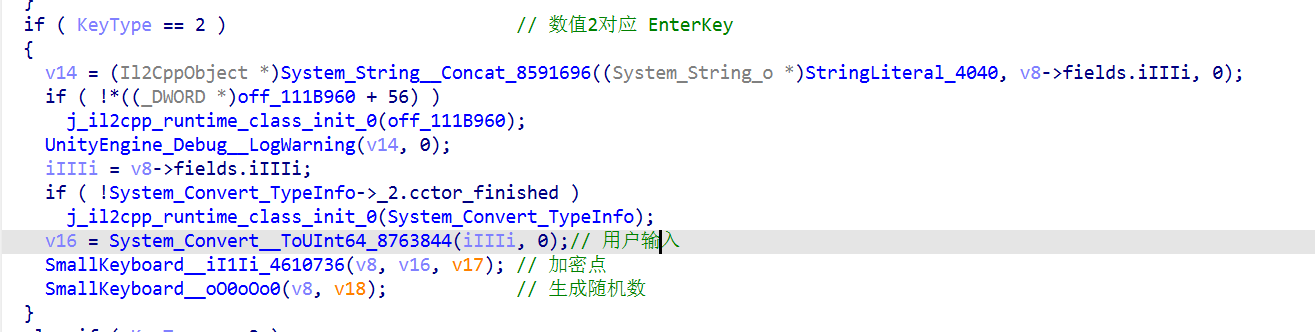
SmallKeyboard__iI1Ii 中,如果keyType == 2就执行 包含生成随机数的一系列函数
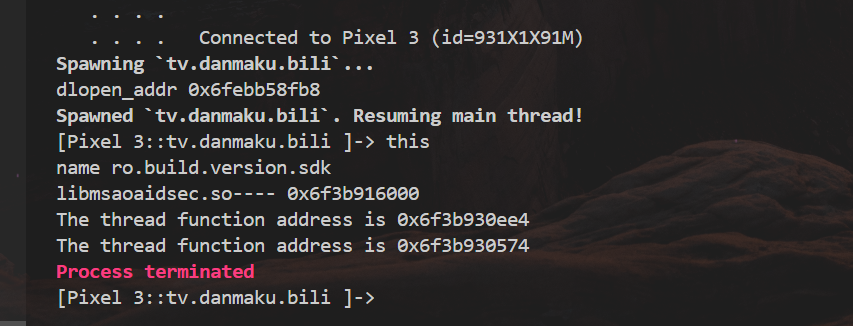
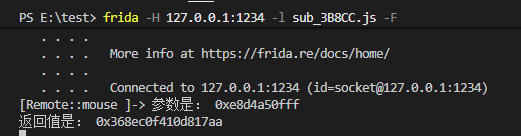
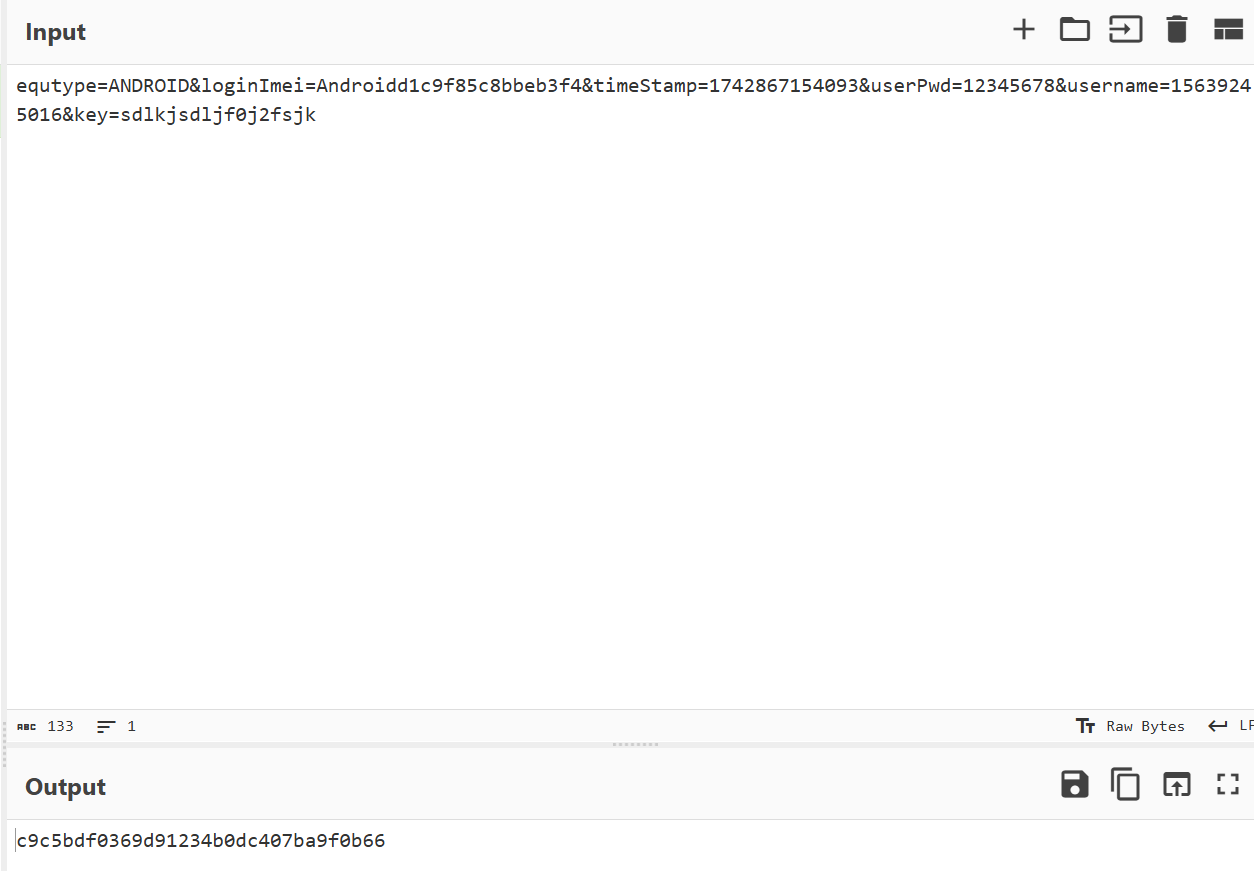
猜测 System_Convert__ToUInt64_8763844 为用户输入函数,使用frida 验证一下猜想
1 2 3 4 5 6 7 8 9 10 11 12 13 14 function hook_input(){ var module = Process.getModuleByName("libil2cpp.so") var addr = module.base.add(0x85B9C4) Interceptor.attach(addr,{ onEnter(args){ }, onLeave(retval){ console.log("返回值是:",retval.toInt32()) } }) } hook_input()
在小键盘处输入 123123
frida 注入 frida -H 127.0.0.1:1234 -l input.js -F
很明显,验证了猜想
每次按下 ok 键后,token 都会更新,正好对应了此处SmallKeyboard__oO0oOo0(v8, v18) 函数的调用
v16 作为参数传入了 SmallKeyboard__iI1Ii_4610736 函数,所以这个函数就是要找的加密点,转到汇编窗口,点进去SmallKeyboard__iI1Ii_4610736 经过两个B (无条件跳转),转到了
ARM64 不允许用一条指令直接取64位地址,所以一般用ADRP+LDR的组合获取全局变量地址
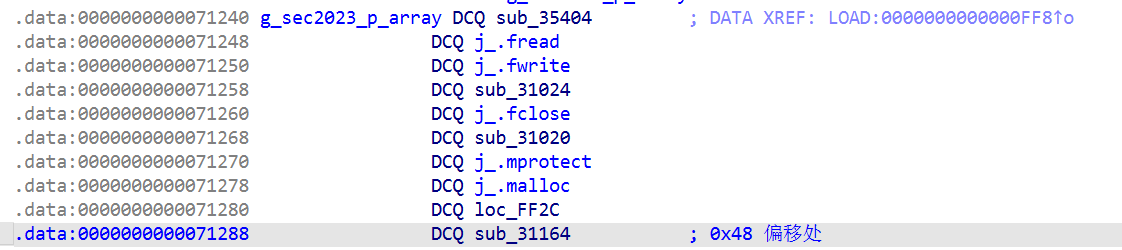
点进去0ff_13BAFF0
跳到了导入函数 g_sec2023_p_array 处,表示要找的加密点应该在libsec2023.so文件的导出函数g_sec2023_p_array 的 0x48偏移处
直接将 /lib 文件夹下的 libsec2023.so 拖入ida中分析,找到导出函数,点进去
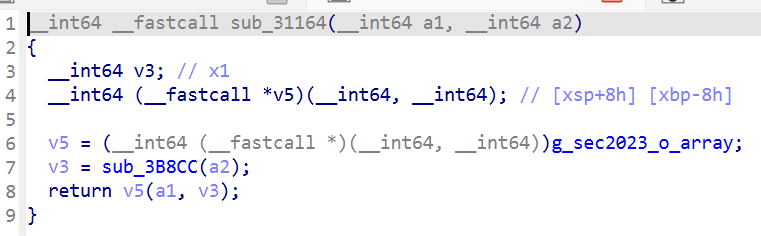
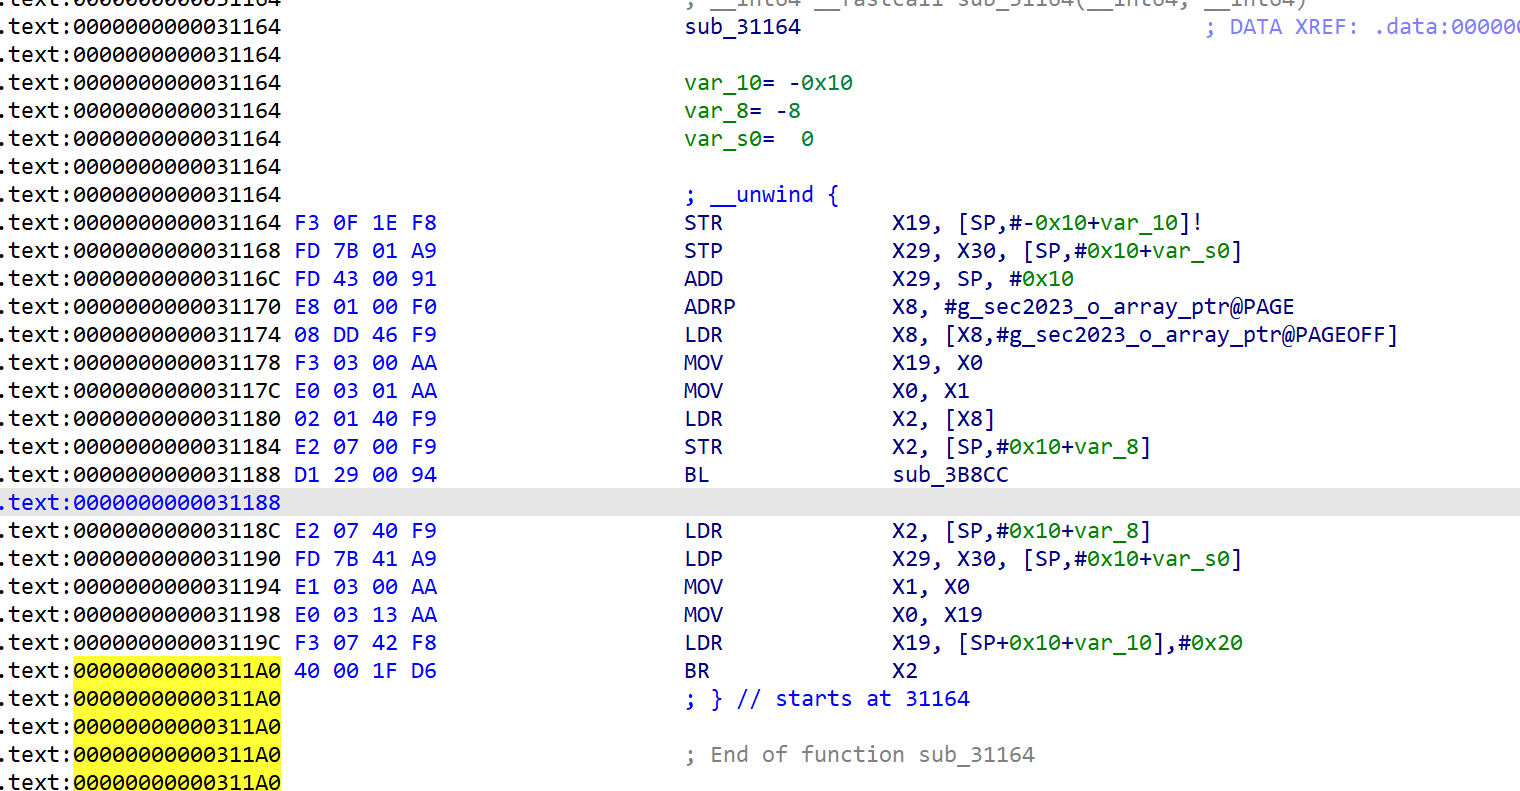
sub_31164 就是跳转处
去除花指令,找到第一个加密点 接下来就是分析 sub_31164 函数
看到有两个加密函数 sub_3B8CC 和 v5
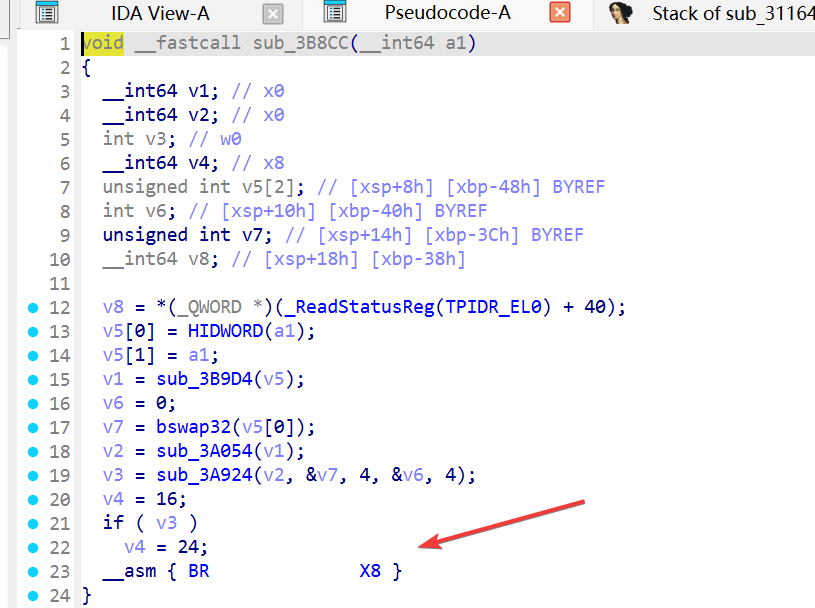
先分析 sub_3B8CC
但是遇到了控制流阻塞 ,ida 静态分析时无法动态的获取寄存器的值,所以无法展示正常的控制流
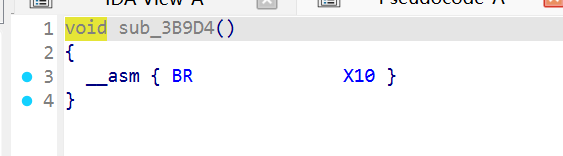
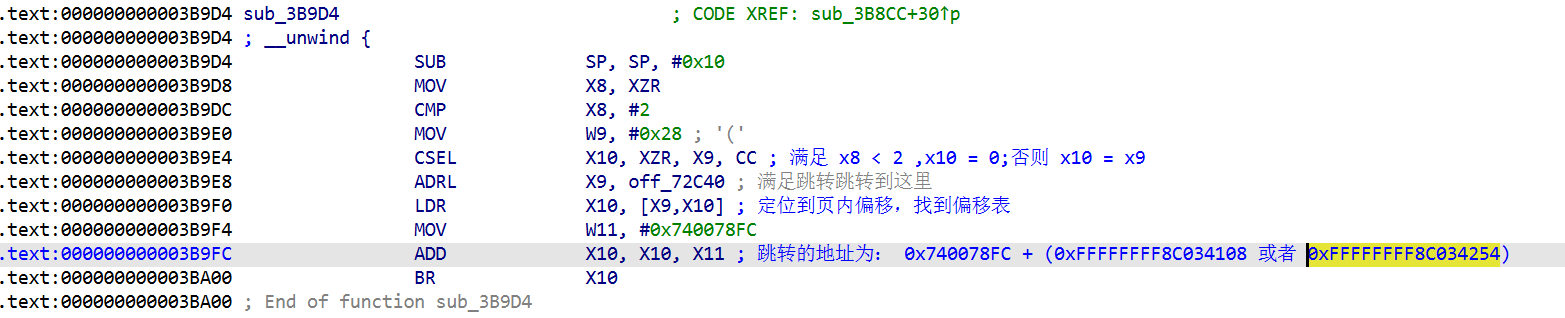
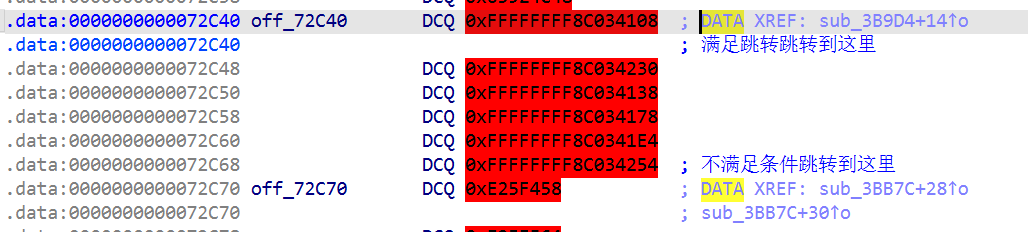
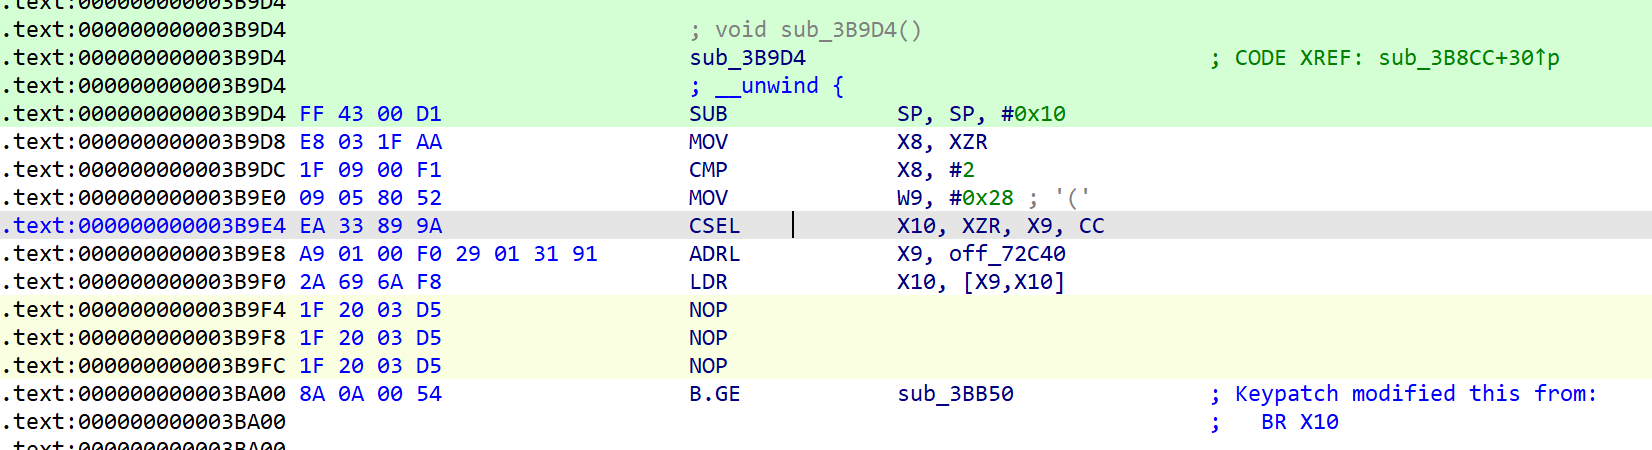
以sub_3B9D4() 函数为例 转到汇编窗口看看
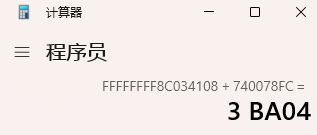
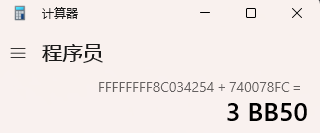
计算一下跳转的地址
手动修复一个控制流,把不需要的汇编代码都nop掉,ida9.2破解版好像缺失 arm64的汇编器插件,太新了,先用ida7.7打开
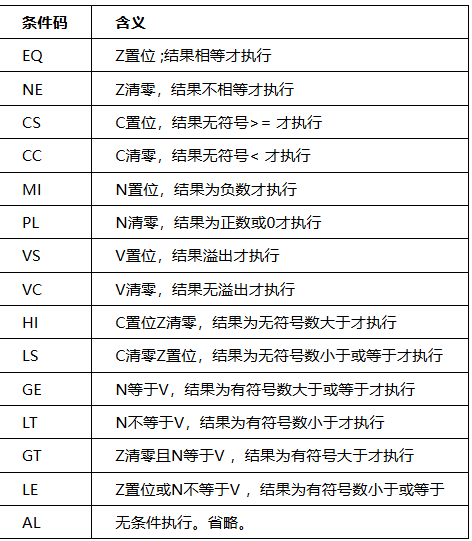
每个条件码的含义
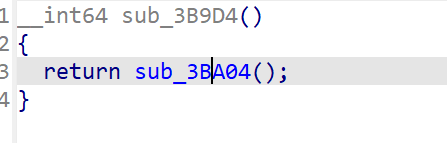
修复后如下图:
再u,c,p,重新F5
阻塞就消失了,变为我们修改的逻辑
so 文件中使用该结构的太多了,所以选择使用半手工半脚本的方式修复
手工修复之前,使用frida stalker先追踪一下每个寄存器值的变化,可以减轻一些工作量
1 2 3 4 5 6 7 8 9 10 11 12 13 14 15 16 17 18 19 20 21 22 23 24 25 26 27 28 29 30 31 32 33 34 35 36 37 38 39 40 41 42 43 44 45 46 47 48 49 50 51 52 53 54 55 56 57 58 59 60 61 62 63 64 65 66 function anti_BR(){ // 因为ida反汇编出的内容遇到 BR X8的阻塞,所以现在使用frida stalker追踪一下x8寄存器 var module = Process.getModuleByName("libsec2023.so") var func_addr = module.base.add(0x31164) console.log("[hook]:",func_addr) Interceptor.attach(func_addr,{ onEnter(args){ console.log("start stalker!") this.tid = Process.getCurrentThreadId() Stalker.exclude({ "base":Process.getModuleByName("libc.so").base, "size":Process.getModuleByName("libc.so").size } ) Stalker.follow(this.tid,{ events:{ call: true, // CALL instructions: yes please // Other events: ret: false, // RET instructions exec: false, // all instructions: not recommended as it's //a lot of data block: false, // block executed: coarse execution trace compile: false // block compiled: useful for coverage }, transform(iterator){ let instruction = iterator.next(); const startAddress = instruction.address; // 判断该条指令是否在代码库中 const isAppCode = startAddress.compare(module.base) >= 0 &&startAddress.compare(module.base.add(module.size)) <= 0; do{ if(isAppCode){ if(instruction.mnemonic === "br"){ // 保存指令的操作数字符串,比如 br x8 ,reg_name保存的便是寄存器的名称 var reg_name = instruction.opStr; var inst_addr = new NativePointer(instruction.address); iterator.putCallout(function(context){ // 地址显示是:undefined //console.log(Process.getModuleByAddress(inst_addr).base) var addr_before = inst_addr.sub(Process.findModuleByAddress(inst_addr).base).toString() //console.log(addr_before) //这是br x8 跳转后的地址 //console.log(Process.findModuleByAddress(ptr(context[reg_name])).base) var addr_after = ptr(context[reg_name]).sub(Process.findModuleByAddress(ptr(context[reg_name])).base).toString() //console.log(addr_after) if(addr_after == undefined){ addr_after = "unknown:"+ context[reg_name] } console.log(addr_before,"jump to:",addr_after,":",reg_name) }); } } iterator.keep(); } while ((instruction = iterator.next()) !== null); } }) console.log("stalker end!"); }, onLeave(retval){ Stalker.unfollow(this.tid); Stalker.garbageCollect(); } }); } anti_BR()
代码注入时,提示 hack ,但是是提顿一会再提示的,猜测这个延迟是sleep,故尝试hook 一下sleep,把 sleep 的时间传入一个指针随便指向什么地方,让sleep一直运行
1 2 3 4 5 6 7 8 9 10 11 12 13 14 15 16 17 18 19 20 function AntiDebug(){ var addr = Module.findExportByName(null,"sleep"); if(!addr){ console.log("sleep 没有找到") }else{ Interceptor.attach(addr,{ onEnter(args){ console.log("success") console.log("原始sleep时间是:",args[0]) console.log("sleep called from:\n"+Thread.backtrace(this.context,Backtracer.ACCURATE) .map(DebugSymbol.fromAddress).join('\n') ) args[0] = ptr(100000) }, onLeave(retval){ } }) } } AntiDebug()
再注入 stalker ,就不再退出
stalker追踪的结果如下:
1 2 3 4 5 6 7 8 9 10 11 12 13 14 15 16 17 18 19 20 21 22 23 24 25 26 27 28 29 30 31 32 33 34 35 36 37 38 39 40 41 42 43 44 45 46 47 48 49 50 51 52 53 54 55 56 57 58 59 60 61 62 63 64 65 66 67 68 69 70 71 72 73 74 75 76 77 78 79 80 81 82 83 84 85 86 87 88 89 90 91 92 93 94 95 96 97 98 99 100 101 102 103 104 105 106 107 108 109 110 111 112 113 114 115 116 117 118 119 120 121 122 123 124 125 126 127 128 129 130 131 132 133 134 135 136 137 138 139 140 141 142 143 144 145 146 147 148 149 150 151 152 153 154 155 156 157 158 159 160 161 162 163 164 165 166 167 168 169 170 171 172 173 174 175 176 177 178 179 180 181 182 183 184 185 186 187 188 189 190 191 192 193 194 195 196 197 198 199 200 201 202 203 204 205 206 207 208 209 210 211 212 213 214 215 216 217 218 219 220 221 222 223 224 225 226 227 228 229 230 231 232 233 234 235 236 237 238 239 240 241 242 243 244 245 246 247 248 249 250 251 252 253 254 255 256 257 258 259 260 261 262 263 264 265 266 267 268 269 270 271 272 273 274 275 276 277 278 279 280 281 282 283 284 285 286 287 288 289 290 291 292 293 294 295 296 297 298 299 300 301 302 303 304 305 306 307 308 309 310 311 312 313 314 315 316 317 318 319 320 321 322 323 324 325 326 327 328 329 330 331 332 333 334 335 336 337 338 339 340 341 342 343 344 345 346 347 348 349 350 351 352 353 354 355 356 357 358 359 360 361 362 363 364 365 366 367 368 369 370 371 372 373 374 375 376 377 378 379 380 381 382 383 384 385 386 387 388 389 390 391 392 393 394 395 396 397 398 399 400 401 402 403 404 405 406 407 408 409 410 411 stalker end! 0x3ba00 jump to: 0x3ba04 : x10 0x3ba30 jump to: 0x3ba34 : x12 0x3ba70 jump to: 0x3ba34 : x12 0x3ba70 jump to: 0x3ba34 : x12 0x3ba70 jump to: 0x3ba34 : x12 0x3ba70 jump to: 0x3ba74 : x12 0x3badc jump to: 0x3bae0 : x13 0x3bb28 jump to: 0x3bae0 : x13 0x3bb28 jump to: 0x3bae0 : x13 0x3bb28 jump to: 0x3bae0 : x13 0x3bb28 jump to: 0x3bb2c : x13 0x3bb4c jump to: 0x3ba04 : x10 0x3ba30 jump to: 0x3ba34 : x12 0x3ba70 jump to: 0x3ba34 : x12 0x3ba70 jump to: 0x3ba34 : x12 0x3ba70 jump to: 0x3ba34 : x12 0x3ba70 jump to: 0x3ba74 : x12 0x3badc jump to: 0x3bae0 : x13 0x3bb28 jump to: 0x3bae0 : x13 0x3bb28 jump to: 0x3bae0 : x13 0x3bb28 jump to: 0x3bae0 : x13 0x3bb28 jump to: 0x3bb2c : x13 0x3bb4c jump to: 0x3bb50 : x10 0x3a08c jump to: 0x3a0f0 : x8 0x3b508 jump to: 0x3b50c : x11 0x3b54c jump to: 0x3b50c : x11 0x3b54c jump to: 0x3b50c : x11 0x3b54c jump to: 0x3b50c : x11 0x3b54c jump to: 0x3b50c : x11 0x3b54c jump to: 0x3b50c : x11 0x3b54c jump to: 0x3b50c : x11 0x3b54c jump to: 0x3b50c : x11 0x3b54c jump to: 0x3b50c : x11 0x3b54c jump to: 0x3b50c : x11 0x3b54c jump to: 0x3b50c : x11 0x3b54c jump to: 0x3b50c : x11 0x3b54c jump to: 0x3b50c : x11 0x3b54c jump to: 0x3b50c : x11 0x3b54c jump to: 0x3b50c : x11 0x3b54c jump to: 0x3b50c : x11 0x3b54c jump to: 0x3b50c : x11 0x3b54c jump to: 0x3b50c : x11 0x3b54c jump to: 0x3b550 : x11 0x3b5c0 jump to: 0x3b5c4 : x11 0x3b604 jump to: 0x3b5c4 : x11 0x3b604 jump to: 0x3b5c4 : x11 0x3b604 jump to: 0x3b5c4 : x11 0x3b604 jump to: 0x3b5c4 : x11 0x3b604 jump to: 0x3b5c4 : x11 0x3b604 jump to: 0x3b5c4 : x11 0x3b604 jump to: 0x3b5c4 : x11 0x3b604 jump to: 0x3b5c4 : x11 0x3b604 jump to: 0x3b5c4 : x11 0x3b604 jump to: 0x3b5c4 : x11 0x3b604 jump to: 0x3b5c4 : x11 0x3b604 jump to: 0x3b5c4 : x11 0x3b604 jump to: 0x3b5c4 : x11 0x3b604 jump to: 0x3b5c4 : x11 0x3b604 jump to: 0x3b5c4 : x11 0x3b604 jump to: 0x3b5c4 : x11 0x3b604 jump to: 0x3b5c4 : x11 0x3b604 jump to: 0x3b608 : x11 0x3aa70 jump to: 0x3aa74 : x8 0x3aaa0 jump to: 0x3aaa4 : x8 0x3aad4 jump to: 0x3aad8 : x8 0x3ab04 jump to: 0x3ab70 : x8 0xf28c jump to: 0x82c40 : x17 0xf4ac jump to: 0x83100 : x17 0x3ac90 jump to: 0x3acc0 : x11 0xf40c jump to: 0x1db30 : x17 0xf28c jump to: 0x82c40 : x17 0xf4ac jump to: 0x83100 : x17 0x3b950 jump to: 0x3b95c : x8 0x3a08c jump to: 0x3a0f0 : x8 0x3b508 jump to: 0x3b50c : x11 0x3b54c jump to: 0x3b50c : x11 0x3b54c jump to: 0x3b50c : x11 0x3b54c jump to: 0x3b50c : x11 0x3b54c jump to: 0x3b50c : x11 0x3b54c jump to: 0x3b50c : x11 0x3b54c jump to: 0x3b50c : x11 0x3b54c jump to: 0x3b50c : x11 0x3b54c jump to: 0x3b50c : x11 0x3b54c jump to: 0x3b50c : x11 0x3b54c jump to: 0x3b50c : x11 0x3b54c jump to: 0x3b50c : x11 0x3b54c jump to: 0x3b50c : x11 0x3b54c jump to: 0x3b50c : x11 0x3b54c jump to: 0x3b50c : x11 0x3b54c jump to: 0x3b50c : x11 0x3b54c jump to: 0x3b50c : x11 0x3b54c jump to: 0x3b50c : x11 0x3b54c jump to: 0x3b550 : x11 0x3b5c0 jump to: 0x3b5c4 : x11 0x3b604 jump to: 0x3b5c4 : x11 0x3b604 jump to: 0x3b5c4 : x11 0x3b604 jump to: 0x3b5c4 : x11 0x3b604 jump to: 0x3b5c4 : x11 0x3b604 jump to: 0x3b5c4 : x11 0x3b604 jump to: 0x3b5c4 : x11 0x3b604 jump to: 0x3b5c4 : x11 0x3b604 jump to: 0x3b5c4 : x11 0x3b604 jump to: 0x3b5c4 : x11 0x3b604 jump to: 0x3b5c4 : x11 0x3b604 jump to: 0x3b5c4 : x11 0x3b604 jump to: 0x3b5c4 : x11 0x3b604 jump to: 0x3b5c4 : x11 0x3b604 jump to: 0x3b5c4 : x11 0x3b604 jump to: 0x3b5c4 : x11 0x3b604 jump to: 0x3b5c4 : x11 0x3b604 jump to: 0x3b5c4 : x11 0x3b604 jump to: 0x3b608 : x11 0x3aa70 jump to: 0x3aa74 : x8 0x3aaa0 jump to: 0x3aaa4 : x8 0x3aad4 jump to: 0x3aad8 : x8 0x3ab04 jump to: 0x3ab70 : x8 0xf28c jump to: 0x82c40 : x17 0xf4ac jump to: 0x83100 : x17 0x3ac90 jump to: 0x3acc0 : x11 0xf40c jump to: 0x1db30 : x17 0xf28c jump to: 0x82c40 : x17 0xf4ac jump to: 0x83100 : x17 0x3b990 jump to: 0x3b99c : x8 0x311a0 jump to: 0x13b8d64 : x2 0xf3fc jump to: 0x1c924 : x17 0xf3fc jump to: 0x1c924 : x17 0xf3fc jump to: 0x1c924 : x17 0xf3fc jump to: 0x1c924 : x17 0xf3fc jump to: 0x1c924 : x17 0xf3fc jump to: 0x1c924 : x17 0xf3fc jump to: 0x1c924 : x17 0xf3fc jump to: 0x1c924 : x17 0xf3fc jump to: 0x1c924 : x17 0xf3fc jump to: 0x1c924 : x17 0xf3fc jump to: 0x1c924 : x17 0xf3fc jump to: 0x1c924 : x17 0xf3fc jump to: 0x1c924 : x17 0xf3fc jump to: 0x1c924 : x17 0xf3fc jump to: 0x1c924 : x17 0xf3fc jump to: 0x1c924 : x17 0xf3fc jump to: 0x1c924 : x17 0xf3fc jump to: 0x1c924 : x17 0xf3fc jump to: 0x1c924 : x17 0xf3fc jump to: 0x1c924 : x17 0xf3fc jump to: 0x1c924 : x17 0xf3fc jump to: 0x1c924 : x17 0xf3fc jump to: 0x1c924 : x17 0xf3fc jump to: 0x1c924 : x17 0xf3fc jump to: 0x1c924 : x17 0xf3fc jump to: 0x1c924 : x17 0xf3fc jump to: 0x1c924 : x17 0xf3fc jump to: 0x1c924 : x17 0xf3fc jump to: 0x1c924 : x17 0xf3fc jump to: 0x1c924 : x17 0xf3fc jump to: 0x1c924 : x17 0xf3fc jump to: 0x1c924 : x17 0xf3fc jump to: 0x1c924 : x17 0xf3fc jump to: 0x1c924 : x17 0xf3fc jump to: 0x1c924 : x17 0xf3fc jump to: 0x1c924 : x17 0xf3fc jump to: 0x1c924 : x17 0xf3fc jump to: 0x1c924 : x17 0xf3fc jump to: 0x1c924 : x17 0xf3fc jump to: 0x1c924 : x17 0xf3fc jump to: 0x1c924 : x17 0xf3fc jump to: 0x1c924 : x17 0xf3fc jump to: 0x1c924 : x17 0xf3fc jump to: 0x1c924 : x17 0xf3fc jump to: 0x1c924 : x17 0xf3fc jump to: 0x1c924 : x17 0xf3fc jump to: 0x1c924 : x17 0xf3fc jump to: 0x1c924 : x17 0xf3fc jump to: 0x1c924 : x17 0xf3fc jump to: 0x1c924 : x17 0xf3fc jump to: 0x1c924 : x17 0xf3fc jump to: 0x1c924 : x17 0xf3fc jump to: 0x1c924 : x17 0xf3fc jump to: 0x1c924 : x17 0xf3fc jump to: 0x1c924 : x17 0xf3fc jump to: 0x1c924 : x17 0xf3fc jump to: 0x1c924 : x17 0xf3fc jump to: 0x1c924 : x17 0xf3fc jump to: 0x1c924 : x17 0xf3fc jump to: 0x1c924 : x17 0xf3fc jump to: 0x1c924 : x17 0xf3fc jump to: 0x1c924 : x17 0xf3fc jump to: 0x1c924 : x17 0xf3fc jump to: 0x1c924 : x17 0xf3fc jump to: 0x1c924 : x17 0xf3fc jump to: 0x1c924 : x17 0xf3fc jump to: 0x1c924 : x17 0xf3fc jump to: 0x1c924 : x17 0xf3fc jump to: 0x1c924 : x17 0xf3fc jump to: 0x1c924 : x17 0xf3fc jump to: 0x1c924 : x17 0xf3fc jump to: 0x1c924 : x17 0xf3fc jump to: 0x1c924 : x17 0xf3fc jump to: 0x1c924 : x17 0xf3fc jump to: 0x1c924 : x17 0xf3fc jump to: 0x1c924 : x17 0xf3fc jump to: 0x1c924 : x17 0xf3fc jump to: 0x1c924 : x17 0xf3fc jump to: 0x1c924 : x17 0xf3fc jump to: 0x1c924 : x17 0xf3fc jump to: 0x1c924 : x17 0xf3fc jump to: 0x1c924 : x17 0xf3fc jump to: 0x1c924 : x17 0xf3fc jump to: 0x1c924 : x17 0xf3fc jump to: 0x1c924 : x17 0xf3fc jump to: 0x1c924 : x17 0xf3fc jump to: 0x1c924 : x17 0xf3fc jump to: 0x1c924 : x17 0xf3fc jump to: 0x1c924 : x17 0xf3fc jump to: 0x1c924 : x17 0xf3fc jump to: 0x1c924 : x17 0xf3fc jump to: 0x1c924 : x17 0xf3fc jump to: 0x1c924 : x17 0xf3fc jump to: 0x1c924 : x17 0xf3fc jump to: 0x1c924 : x17 0xf3fc jump to: 0x1c924 : x17 0xf3fc jump to: 0x1c924 : x17 0xf3fc jump to: 0x1c924 : x17 0xf3fc jump to: 0x1c924 : x17 0xf3fc jump to: 0x1c924 : x17 0xf3fc jump to: 0x1c924 : x17 0xf3fc jump to: 0x1c924 : x17 0xf3fc jump to: 0x1c924 : x17 0xf3fc jump to: 0x1c924 : x17 0xf3fc jump to: 0x1c924 : x17 0xf3fc jump to: 0x1c924 : x17 0xf3fc jump to: 0x1c924 : x17 0xf3fc jump to: 0x1c924 : x17 0xf3fc jump to: 0x1c924 : x17 0xf3fc jump to: 0x1c924 : x17 0xf3fc jump to: 0x1c924 : x17 0xf3fc jump to: 0x1c924 : x17 0xf3fc jump to: 0x1c924 : x17 0xf3fc jump to: 0x1c924 : x17 0xf3fc jump to: 0x1c924 : x17 0xf3fc jump to: 0x1c924 : x17 0xf3fc jump to: 0x1c924 : x17 0xf3fc jump to: 0x1c924 : x17 0xf3fc jump to: 0x1c924 : x17 0xf3fc jump to: 0x1c924 : x17 0xf3fc jump to: 0x1c924 : x17 0xf3fc jump to: 0x1c924 : x17 0xf3fc jump to: 0x1c924 : x17 0xf3fc jump to: 0x1c924 : x17 0xf3fc jump to: 0x1c924 : x17 0xf3fc jump to: 0x1c924 : x17 0xf3fc jump to: 0x1c924 : x17 0xf3fc jump to: 0x1c924 : x17 0xf3fc jump to: 0x1c924 : x17 0xf3fc jump to: 0x1c924 : x17 0xf3fc jump to: 0x1c924 : x17 0xf3fc jump to: 0x1c924 : x17 0xf3fc jump to: 0x1c924 : x17 0xf3fc jump to: 0x1c924 : x17 0xf3fc jump to: 0x1c924 : x17 0xf3fc jump to: 0x1c924 : x17 0xf3fc jump to: 0x1c924 : x17 0xf3fc jump to: 0x1c924 : x17 0xf3fc jump to: 0x1c924 : x17 0xf3fc jump to: 0x1c924 : x17 0xf3fc jump to: 0x1c924 : x17 0xf3fc jump to: 0x1c924 : x17 0xf3fc jump to: 0x1c924 : x17 0xf3fc jump to: 0x1c924 : x17 0xf3fc jump to: 0x1c924 : x17 0xf3fc jump to: 0x1c924 : x17 0xf3fc jump to: 0x1c924 : x17 0xf3fc jump to: 0x1c924 : x17 0xf3fc jump to: 0x1c924 : x17 0xf3fc jump to: 0x1c924 : x17 0xf3fc jump to: 0x1c924 : x17 0xf3fc jump to: 0x1c924 : x17 0xf3fc jump to: 0x1c924 : x17 0xf3fc jump to: 0x1c924 : x17 0xf3fc jump to: 0x1c924 : x17 0xf3fc jump to: 0x1c924 : x17 0xf3fc jump to: 0x1c924 : x17 0xf3fc jump to: 0x1c924 : x17 0xf3fc jump to: 0x1c924 : x17 0xf3fc jump to: 0x1c924 : x17 0xf3fc jump to: 0x1c924 : x17 0xf3fc jump to: 0x1c924 : x17 0xf3fc jump to: 0x1c924 : x17 0xf3fc jump to: 0x1c924 : x17 0xf3fc jump to: 0x1c924 : x17 0xf3fc jump to: 0x1c924 : x17 0xf3fc jump to: 0x1c924 : x17 0xf3fc jump to: 0x1c924 : x17 0xf3fc jump to: 0x1c924 : x17 0xf3fc jump to: 0x1c924 : x17 0xf3fc jump to: 0x1c924 : x17 0xf3fc jump to: 0x1c924 : x17 0xf3fc jump to: 0x1c924 : x17 0xf3fc jump to: 0x1c924 : x17 0xf3fc jump to: 0x1c924 : x17 0xf3fc jump to: 0x1c924 : x17 0xf3fc jump to: 0x1c924 : x17 0xf3fc jump to: 0x1c924 : x17 0xf3fc jump to: 0x1c924 : x17 0xf3fc jump to: 0x1c924 : x17 0xf3fc jump to: 0x1c924 : x17 0xf3fc jump to: 0x1c924 : x17 0xf3fc jump to: 0x1c924 : x17 0xf3fc jump to: 0x1c924 : x17 0xf3fc jump to: 0x1c924 : x17 0xf3fc jump to: 0x1c924 : x17 0xf3fc jump to: 0x1c924 : x17 0xf3fc jump to: 0x1c924 : x17 0xf3fc jump to: 0x1c924 : x17 0xf3fc jump to: 0x1c924 : x17 0xf3fc jump to: 0x1c924 : x17 0xf3fc jump to: 0x1c924 : x17 0xf3fc jump to: 0x1c924 : x17 0xf3fc jump to: 0x1c924 : x17 0xf3fc jump to: 0x1c924 : x17 0xf3fc jump to: 0x1c924 : x17 0xf3fc jump to: 0x1c924 : x17 0xf3fc jump to: 0x1c924 : x17 0xf3fc jump to: 0x1c924 : x17 0xf3fc jump to: 0x1c924 : x17 0xf3fc jump to: 0x1c924 : x17 0xf3fc jump to: 0x1c924 : x17 0xf3fc jump to: 0x1c924 : x17 0xf3fc jump to: 0x1c924 : x17 0xf3fc jump to: 0x1c924 : x17 0xf3fc jump to: 0x1c924 : x17 0xf3fc jump to: 0x1c924 : x17 0xf3fc jump to: 0x1c924 : x17 0xf3fc jump to: 0x1c924 : x17 0xf3fc jump to: 0x1c924 : x17 0xf3fc jump to: 0x1c924 : x17 0xf3fc jump to: 0x1c924 : x17 0xf3fc jump to: 0x1c924 : x17 0xf3fc jump to: 0x1c924 : x17 0xf3fc jump to: 0x1c924 : x17 0xf3fc jump to: 0x1c924 : x17 0xf3fc jump to: 0x1c924 : x17 0xf3fc jump to: 0x1c924 : x17 0xf3fc jump to: 0x1c924 : x17 0xf3fc jump to: 0x1c924 : x17 0xf3fc jump to: 0x1c924 : x17 0xf3fc jump to: 0x1c924 : x17 0xf3fc jump to: 0x1c924 : x17 0xf3fc jump to: 0x1c924 : x17 0xf3fc jump to: 0x1c924 : x17 0xf3fc jump to: 0x1c924 : x17 0xf3fc jump to: 0x1c924 : x17 0xf3fc jump to: 0x1c924 : x17 0xf3fc jump to: 0x1c924 : x17 0xf3fc jump to: 0x1c924 : x17 0xf3fc jump to: 0x1c924 : x17 0xf3fc jump to: 0x1c924 : x17 0xf3fc jump to: 0x1c924 : x17 0xf3fc jump to: 0x1c924 : x17 0xf3fc jump to: 0x1c924 : x17 0xf3fc jump to: 0x1c924 : x17 0xf3fc jump to: 0x1c924 : x17 0xf3fc jump to: 0x1c924 : x17 0xf3fc jump to: 0x1c924 : x17 0xf3fc jump to: 0x1c924 : x17 0xf3fc jump to: 0x1c924 : x17 0xf3fc jump to: 0x1c924 : x17 0xf3fc jump to: 0x1c924 : x17 0xf3fc jump to: 0x1c924 : x17 0xf3fc jump to: 0x1c924 : x17 0xf3fc jump to: 0x1c924 : x17 0xf3fc jump to: 0x1c924 : x17 0xf3fc jump to: 0x1c924 : x17 0xf3fc jump to: 0x1c924 : x17 0xf3fc jump to: 0x1c924 : x17 0xf3fc jump to: 0x1c924 : x17 0xf3fc jump to: 0x1c924 : x17 0xf3fc jump to: 0x1c924 : x17 0xf3fc jump to: 0x1c924 : x17 0xf3fc jump to: 0x1c924 : x17 0xf3fc jump to: 0x1c924 : x17 0xf3fc jump to: 0x1c924 : x17 0xf3fc jump to: 0x1c924 : x17 0xf3fc jump to: 0x1c924 : x17 0xf3fc jump to: 0x1c924 : x17 0xf3fc jump to: 0x1c924 : x17 0xf3fc jump to: 0x1c924 : x17 0xf3fc jump to: 0x1c924 : x17 0xf3fc jump to: 0x1c924 : x17 0xf3fc jump to: 0x1c924 : x17 0xf3fc jump to: 0x1c924 : x17 0xf3fc jump to: 0x1c924 : x17 0xf3fc jump to: 0x1c924 : x17 0xf3fc jump to: 0x1c924 : x17 0xf3fc jump to: 0x1c924 : x17 0xf3fc jump to: 0x1c924 : x17 0xf3fc jump to: 0x1c924 : x17 0xf3fc jump to: 0x1c924 : x17 0xf3fc jump to: 0x1c924 : x17 0xf3fc jump to: 0x1c924 : x17 0xf3fc jump to: 0x1c924 : x17 0xf3fc jump to: 0x1c924 : x17 0xf3fc jump to: 0x1c924 : x17 0xf3fc jump to: 0x1c924 : x17 0xf3fc jump to: 0x1c924 : x17 0xf3fc jump to: 0x1c924 : x17 0xf3fc jump to: 0x1c924 : x17 0xf3fc jump to: 0x1c924 : x17 0xf3fc jump to: 0x1c924 : x17 0xf3fc jump to: 0x1c924 : x17 0xf3fc jump to: 0x1c924 : x17
由追踪到的结果可知,br 跳转指令,要么跳到紧接着的下一个指令处,要么跳转到另一个函数处
去除CSEL 指令的脚本如下:
1 2 3 4 5 6 7 8 9 10 11 12 13 14 15 16 17 18 19 20 21 22 23 24 25 26 27 28 29 30 31 32 33 34 35 36 37 38 39 40 41 42 43 44 45 46 47 48 49 50 51 52 53 54 55 56 57 58 59 60 61 62 63 64 65 66 67 68 69 70 71 72 73 74 75 76 77 78 79 80 81 82 83 84 85 86 87 88 89 90 91 92 93 94 95 96 97 98 99 100 101 102 103 104 105 106 107 108 109 110 111 112 113 114 115 116 117 118 119 120 121 122 123 124 125 126 127 128 129 130 131 132 133 134 135 136 137 138 139 140 141 142 143 144 145 146 147 148 149 150 151 152 153 154 155 156 157 158 159 160 161 162 163 164 165 166 167 168 169 170 171 172 173 174 175 176 177 178 179 import ida_bytes import ida_ida import ida_segment import idc import idautils import idaapi from keystone import * def patch_nop(begin, end): # arm64中的NOP指令是b'\x1F\x20\x03\xD5' while end > begin: ida_bytes.patch_bytes(begin, b'\x1F\x20\x03\xD5') begin = begin + 4 #获取text段的起始地址 text_seg=ida_segment.get_segm_by_name(".text") start=text_seg.start_ea end=text_seg.end_ea cur_addr=start #在结构修复完之后需要nop的指令地址 nop_addr_after_finsh=[] while cur_addr<end: #找到CSEL指令 if idc.print_insn_mnem(cur_addr)=="CSEL": csel_addr=cur_addr nop_addr_after_finsh_tmp=[] nop_addr_after_finsh_tmp.append(csel_addr) BR_reg="" BR_addr=0 tmp_addr=idc.next_head(csel_addr) #向下寻找BR指令 for i in range(9): if idc.print_insn_mnem(tmp_addr)=="BR": BR_addr=tmp_addr BR_reg=idc.print_operand(tmp_addr,0) break if idc.print_insn_mnem(tmp_addr)=="CSEL": break tmp_addr=idc.next_head(tmp_addr) #找到了BR指令 if BR_addr!=0: #获取CSEL的op1~3寄存器,以及条件码 CSEL_opt1=idc.print_operand(csel_addr,0) CSEL_opt2=idc.print_operand(csel_addr,1) CSEL_opt2_val=-1 CSEL_opt3=idc.print_operand(csel_addr,2) CSEL_opt3_val=-1 CSEL_cond=idc.print_operand(csel_addr,3) tmp_addr=idc.prev_addr(csel_addr) while (CSEL_opt2_val==-1 or CSEL_opt3_val==-1) and tmp_addr >start: #读取条件分支语句CSEL要赋值给目标寄存器的两个源寄存器中的值 #XZR代表0 if CSEL_opt2=="XZR": CSEL_opt2_val=0 if CSEL_opt3=="XZR": CSEL_opt3_val=0 if idc.print_insn_mnem(tmp_addr)=="MOV": #这里切片是因为x19和W19是一样的寄存器,用[1::]可以只取到后面的19 if idc.print_operand(tmp_addr,0)[1::]==CSEL_opt2[1::] and CSEL_opt2_val==-1: CSEL_opt2_val=idc.get_operand_value(tmp_addr,1) nop_addr_after_finsh_tmp.append(tmp_addr) if idc.print_operand(tmp_addr, 0)[1::] == CSEL_opt3[1::] and CSEL_opt3_val == -1: CSEL_opt3_val = idc.get_operand_value(tmp_addr, 1) nop_addr_after_finsh_tmp.append(tmp_addr) tmp_addr=idc.prev_head(tmp_addr) assert CSEL_opt3_val!=-1 and CSEL_opt2_val!=-1 #print(f"偏移是{CSEL_opt2_val},{CSEL_opt3_val}") #现在开始取跳转表所在的位置,加到跳转的值 tmp_addr=BR_addr jump_array_reg=""#储存跳转表所在的寄存器 jump_array_addr=-1#存储跳转表所在的地址 add_reg=[]#存储加到跳转表的值的寄存器 add_val=-1#加到跳转表的值 #从BR后往前找,到CSEL_结束,存储跳转表等修复数据 while tmp_addr>csel_addr: if idc.print_insn_mnem(tmp_addr)=="ADD" and idc.print_operand(tmp_addr,0)==BR_reg: add_reg.append(idc.print_operand(tmp_addr,1)[1::]) add_reg.append(idc.print_operand(tmp_addr,2)[1::]) nop_addr_after_finsh_tmp.append(tmp_addr) elif idc.print_insn_mnem(tmp_addr)=="MOV" and idc.print_operand(tmp_addr,0)[1::] in add_reg: add_val=idc.get_operand_value(tmp_addr,1) nop_addr_after_finsh_tmp.append(tmp_addr) elif idc.print_insn_mnem(tmp_addr)=="LDR": #获取存储跳转表地址的寄存器名称,后面是那个寄存器加载的不重要 jump_array_reg=idc.print_operand(tmp_addr,1)[1:-1].split(",")[0]#切片去除[],以,为标记分割,取第一个寄存器 nop_addr_after_finsh_tmp.append(tmp_addr) elif idc.print_insn_mnem(tmp_addr)=="ADRL" : jump_array_reg=idc.print_operand(tmp_addr,0) jump_array_addr=idc.get_operand_value(tmp_addr,1) nop_addr_after_finsh_tmp.append(tmp_addr) elif idc.print_insn_mnem(tmp_addr)=="SXTW": if idc.print_operand(tmp_addr,0)[1::] in add_reg: reg=idc.print_operand(tmp_addr,1)[1::] while tmp_addr>start: if idc.print_insn_mnem(tmp_addr)=="MOV" and idc.print_operand(tmp_addr,1)[1::]==reg: add_val=idc.get_operand_value(tmp_addr,1) nop_addr_after_finsh_tmp.append(tmp_addr) break tmp_addr=idc.prev_head(tmp_addr) tmp_addr=idc.prev_head(tmp_addr) #如果在CSEL_BR中间没有跳转表地址,就向上找 if jump_array_addr==-1: tmp_addr=idc.prev_head(tmp_addr) while tmp_addr>start: if idc.print_insn_mnem(tmp_addr)=="ADRL": if idc.print_operand(tmp_addr,0)==jump_array_reg: jump_array_addr = idc.get_operand_value(tmp_addr, 1) nop_addr_after_finsh_tmp.append(tmp_addr) break elif idc.print_insn_mnem(tmp_addr)=="ADRP": if idc.print_operand(tmp_addr,0)==jump_array_reg: jump_array_addr = idc.get_operand_value(tmp_addr, 1) nop_addr_after_finsh_tmp.append(tmp_addr) #观察到ADPR还有一部分ADD while tmp_addr<end: if idc.print_insn_mnem(tmp_addr)=="ADD": if idc.print_operand(tmp_addr,0)==jump_array_reg: jump_array_addr+=idc.get_operand_value(tmp_addr,2) nop_addr_after_finsh_tmp.append(tmp_addr) break tmp_addr=idc.next_head(tmp_addr) break tmp_addr=idc.prev_head(tmp_addr) #如果没有找到加在跳转表的值 if add_val==-1: tmp_addr=tmp_addr while tmp_addr>start: if idc.print_insn_mnem(tmp_addr)=="MOV": if idc.print_operand(tmp_addr,0)[1::] in add_reg: add_val=idc.get_operand_value(tmp_addr,1) nop_addr_after_finsh_tmp.append(tmp_addr) break elif idc.print_insn_mnem(tmp_addr)=="SXTW": if idc.print_operand(tmp_addr,0)[1::] in add_reg: reg=idc.print_operand(tmp_addr,1)[1::] while tmp_addr>start: if idc.print_insn_mnem(tmp_addr)=="MOV" and idc.print_operand(tmp_addr,1)[1::]==reg: add_val=idc.get_operand_value(tmp_addr,1) nop_addr_after_finsh_tmp.append(tmp_addr) break tmp_addr=idc.prev_head(tmp_addr) break tmp_addr=idc.prev_head(tmp_addr) ''' print(f"加到跳转表的值{hex(add_val)}") print(f"加到跳转表的值{hex(add_val)}") print(add_reg) print(f"寄存表的值{hex(ida_bytes.get_qword(jump_array_addr+CSEL_opt2_val)+add_val)}") print(f"寄存表的值{hex(ida_bytes.get_qword(jump_array_addr+CSEL_opt3_val)+add_val)}") ''' #计算两个分支的位置 branch_a=(ida_bytes.get_qword(jump_array_addr+CSEL_opt2_val)+add_val)& 0xffffffffffffffff branch_b=(ida_bytes.get_qword(jump_array_addr+CSEL_opt3_val)+add_val)& 0xffffffffffffffff logic_rev = {"GE": "LT", "LT": "GE", "EQ": "NE", "NE": "EQ", "CC": "CS", "CS": "CC", "HI": "LS", "LS": "HI"} ks = Ks(KS_ARCH_ARM64, KS_MODE_LITTLE_ENDIAN) code = "" if branch_b == idc.next_head(BR_addr): # 判断逻辑不取反 code = f"B.{CSEL_cond} #{hex(branch_a)}" elif branch_a == idc.next_head(BR_addr): # 判断逻辑取反 code = f"B.{logic_rev[CSEL_cond]} #{hex(branch_b)}" #修复BR if code!="": patch_br_byte,cout=ks.asm(code,addr=BR_addr) ida_bytes.patch_bytes(BR_addr,bytes(patch_br_byte)) print(f"fix CSEL_RB at {hex(BR_addr)}") nop_addr_after_finsh.extend(nop_addr_after_finsh_tmp) cur_addr=idc.next_addr(BR_addr) else: print(f"error! unable to fix CSEL-BR at {hex(cur_addr)},branch:{hex(branch_a)}, {hex(branch_b)}") cur_addr=idc.next_head(cur_addr) for addr in nop_addr_after_finsh: patch_nop(addr,addr+idc.get_item_size(addr))
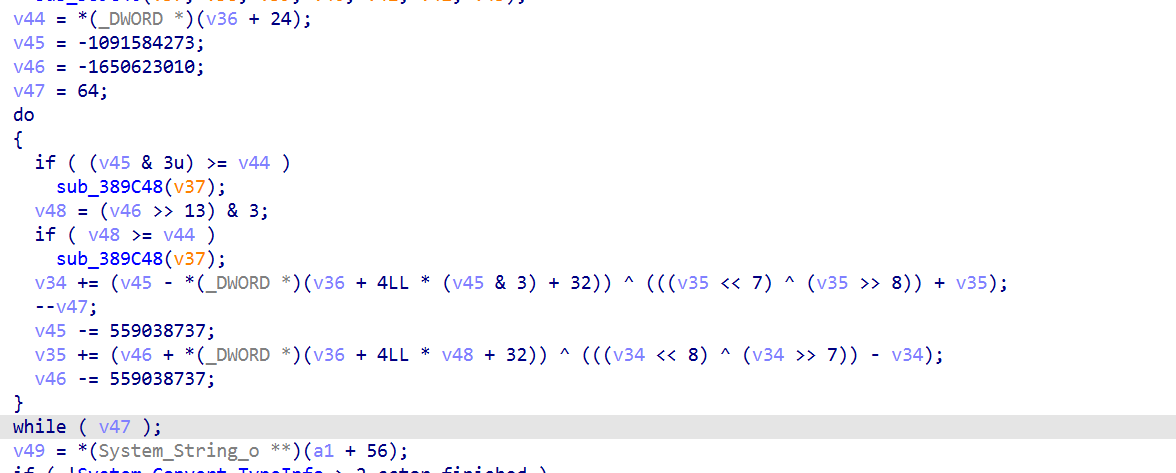
控制流都清晰了,捋一下sub_3B9D4()
1 2 3 4 5 6 7 8 9 10 11 12 13 14 15 16 17 18 19 20 21 22 23 24 25 26 27 28 if(x8 >=2){ sub_3BB50() } else{ do { *((_BYTE *)&a5 + v5 + 4) = (*(_DWORD *)(a1 + 4 * a3) >> v6) ^ v5; --v5; v6 -= 8; } while ( v5 >= 0 ); HIBYTE(a5) ^= 0x86u; BYTE6(a5) -= 94; BYTE5(a5) ^= 0xD3u; BYTE4(a5) -= 28; *(_DWORD *)(a1 + 4 * a3) = 0; do { v8 = *((_BYTE *)&a5 + v6 + 4) - v7; *((_BYTE *)&a5 + v6-- + 4) = v8; v5 += v8 << v7; *(_DWORD *)(a1 + 4 * a3) = v5; v7 -= 8; } while ( v6 >= 0 ); } 然后进入循环
加密过程比较清晰了:去除数据的每一位进行加密
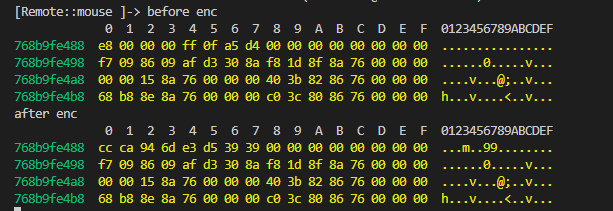
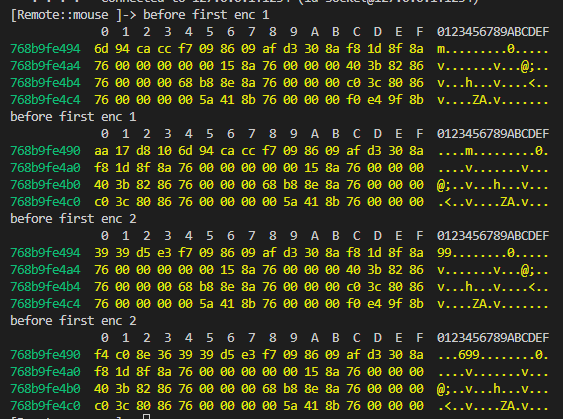
hook一下 sub_3B9D4(),看输入的值和返回的值
hex(999999999999) = 0xE8D4A50FFF
加密后:0x 6d94cacc 3939d5e3 ,小端存储:最低有效位在低地址
编写解密脚本:
1 2 3 4 5 6 7 8 9 10 11 12 13 14 15 16 17 18 19 20 21 22 23 24 25 26 27 28 29 30 31 32 33 34 35 36 37 38 39 40 41 42 # 用户输入:999999999999,返回值是:0x6d94cacc3939d5e3 algorithm_1={ (0,"enc") :lambda x: (x-28) & 0xff, # 防止溢出或负数, 确保结果在 0~255 之间 (1,"enc") :lambda x: (x^0xD3), (2,"enc") :lambda x: (x-94) & 0xff, (3,"enc") :lambda x: (x^0x86), (0,"dec") :lambda x: (x+28) & 0xff, (1,"dec") :lambda x: (x^0xD3), (2,"dec") :lambda x: (x+94) & 0xff, (3,"dec") :lambda x: (x^0x86) } #加密 def enc_1(input): input_bytes = bytearray(input.to_bytes(8,'little')) enc_array = [0] * len(input_bytes) for i in range(len(input_bytes)): index = i % 4 enc_array[i] = (algorithm_1[(index,"enc")](input_bytes[i]^ index) - 8*index ) & 0xff return int.from_bytes(bytearray(enc_array),'little') #解密 def dec_1(input): input_bytes = bytearray(input.to_bytes(8,'little')) dec_array = [0] * len(input_bytes) for i in range(len(input_bytes)): index = i % 4 dec_array[i] = (algorithm_1[(index,"dec")]((input_bytes[i] + 8*index)&0xff) ^ index) return int.from_bytes(bytearray(dec_array),'little') def test(): test_value = 999999999999 enc_value = enc_1(test_value) dec_value = dec_1(enc_value) print(f"Test Value: {test_value}") print(f"Encrypted Value: {hex(enc_value)}") print(f"Decrypted Value: {dec_value}") assert test_value == dec_value, "Decryption did not return the original value!" test()
第一个加密点搞定
第二个加密点 回到 sub_3B8CC(),继续往下分析,发现CSET结构,结合stalker追踪到的值修复一下控制流,在修改过控制流函数的任意处,按下u,c,p,再F5就可显示出逻辑
整理一下sub_3B8CC(),逻辑如下
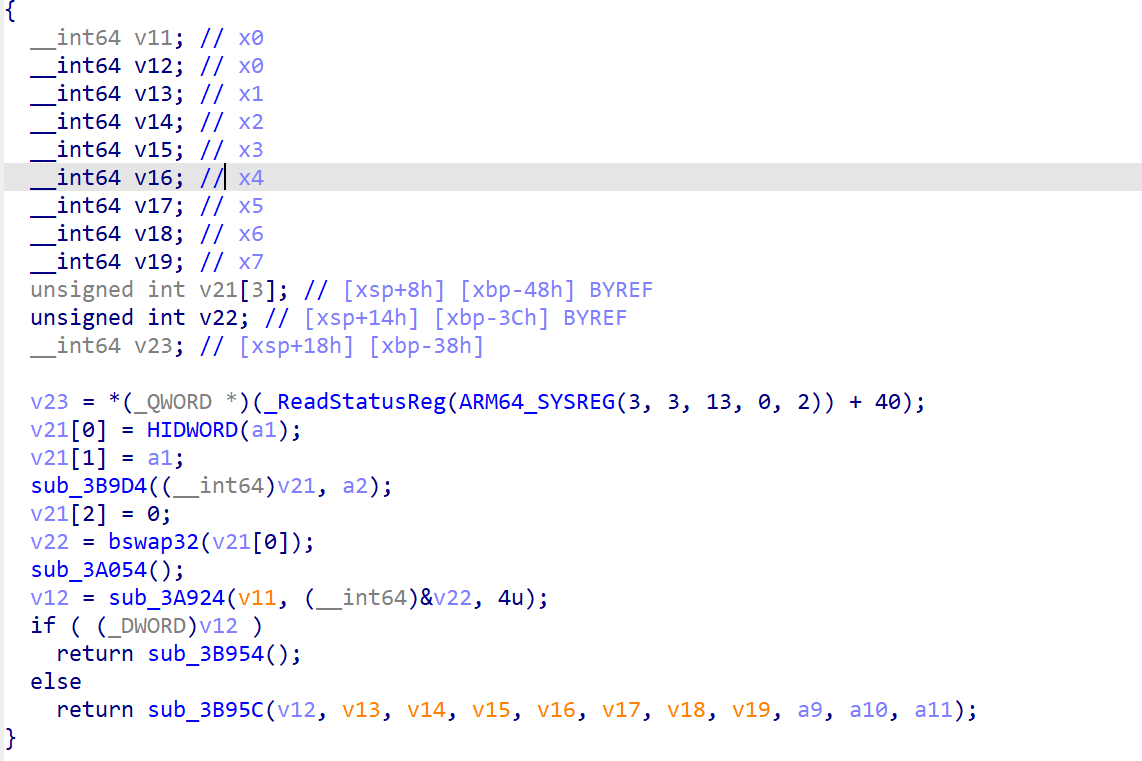
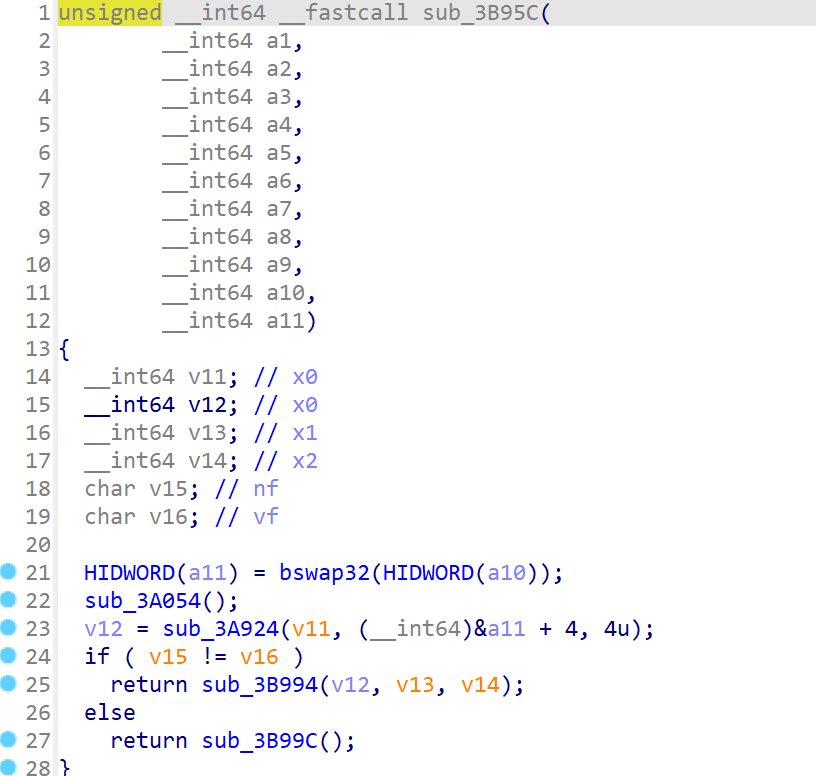
1 2 3 4 5 6 7 8 9 10 11 12 13 14 15 16 17 18 19 20 21 22 23 24 25 unsigned __int64 __fastcall sub_3B8CC(__int64 a1, __int64 a2) { __int64 v2; // x0 unsigned int v4[3]; // [xsp+8h] [xbp-48h] BYREF unsigned int v5; // [xsp+14h] [xbp-3Ch] BYREF __int64 v6; // [xsp+18h] [xbp-38h] v6 = *(_QWORD *)(_ReadStatusReg(ARM64_SYSREG(3, 3, 13, 0, 2)) + 40); v4[0] = HIDWORD(a1); v4[1] = a1; sub_3B9D4((__int64)v4, a2); ;第一个加密处 v4[2] = 0; v5 = bswap32(v4[0]); ;大小端转换 sub_3A054(); if ( (unsigned int)sub_3A924(v2, (__int64)&v5, 4u) ) ;第二个加密点,先加密高位 return sub_3B954(); else HIDWORD(a11) = bswap32(HIDWORD(a10)); sub_3A054(); v12 = sub_3A924(v11, (__int64)&a11 + 4, 4u); ;第二个加密点,再加密低位 if ( v15 != v16 ) return sub_3B994(v12, v13, v14); else return v0 | ((unsigned __int64)v2 << 32); ;高位和低位交换位置 }
hook一下 sub_3A924,在ida中追踪下来,返回值是布尔值,所以该加密函数将加密的结果存放在了参数指针指向的缓冲区中
1 2 3 4 5 6 7 8 9 10 11 12 13 14 15 16 17 18 19 20 21 22 23 24 25 26 27 28 29 30 31 32 33 34 35 36 37 // sub_3A924 查看其参数和加密缓冲区的内容 // 很多 C/C++ 的加密函数并不返回加密结果,而是把结果写到参数传进来的内存地址里(比如 args[3])。 // 函数的返回值只返回了符号象征,0或1 var count = 0; var outbuffer_addr = [0,0] function sub_3A924(){ var module = Process.getModuleByName("libsec2023.so") var func_addr = module.base.add(0x3A924) // 当这个函数执行时,就执行我们写的回调函数 Interceptor.attach(func_addr,{ //函数被调用的瞬间执行 onEnter(args){ console.log("before first enc",count+1) //这个参数可能是加密输出的缓冲区 outbuffer_addr[count] = args[3] console.log(hexdump(args[1],{ offset: 0, length: 64, header: true, ansi: true })) }, //函数执行完毕,返回前执行 onLeave(retval){ console.log("before first enc",count+1) console.log(hexdump(outbuffer_addr[count],{ offset: 0, length: 64, header: true, ansi: true })); count += 1; } }) } sub_3A924()
第一个加密点的返回值是:0x 6d94cacc 3939d5e3
此处的两个加密参数正好对应两次 bswap32
第二次加密后得到的值为:0x10d817aa 368ec0f4
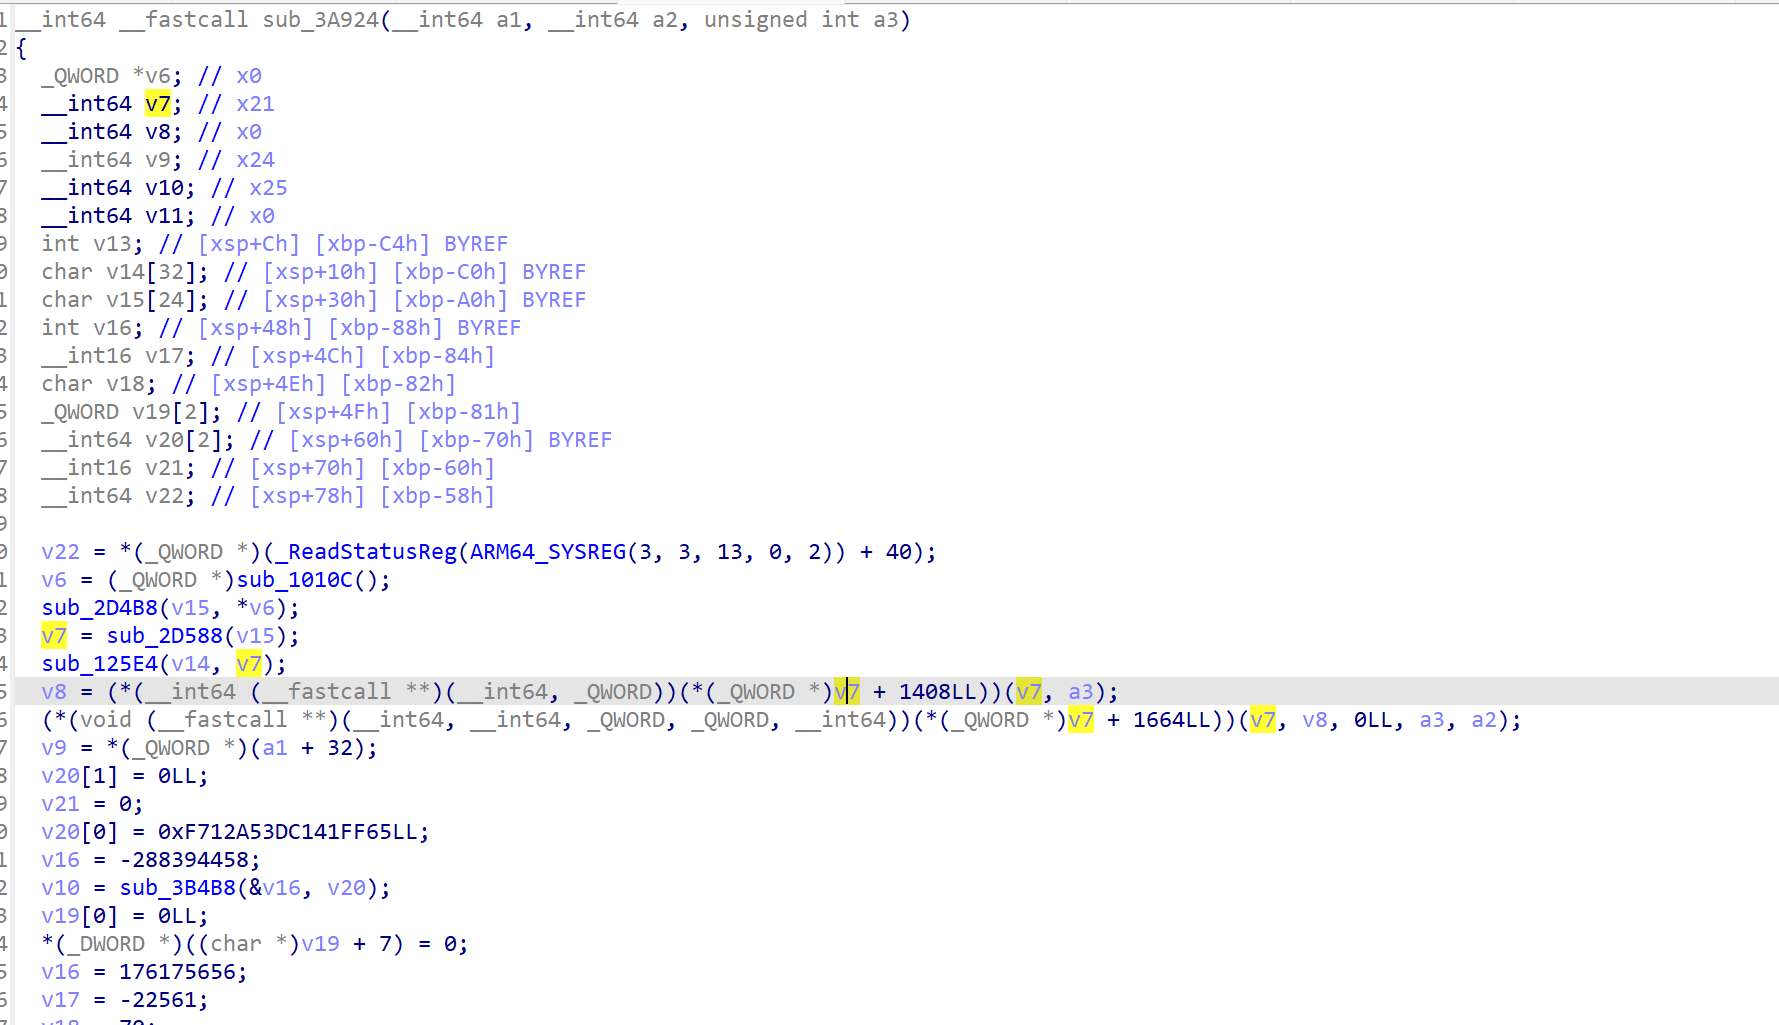
进入 sub_3A924 分析:
发现有很多 v7 + 1408LL v7 + 1664LL …. v7+offset的 ____fastcall 函数调用,v7一般就是 JNIEnv* 类型的指针了,但是ida分析时不知道它是什么类型的,所以默认为普通的指针
理解JNIEnv
手动修改一下
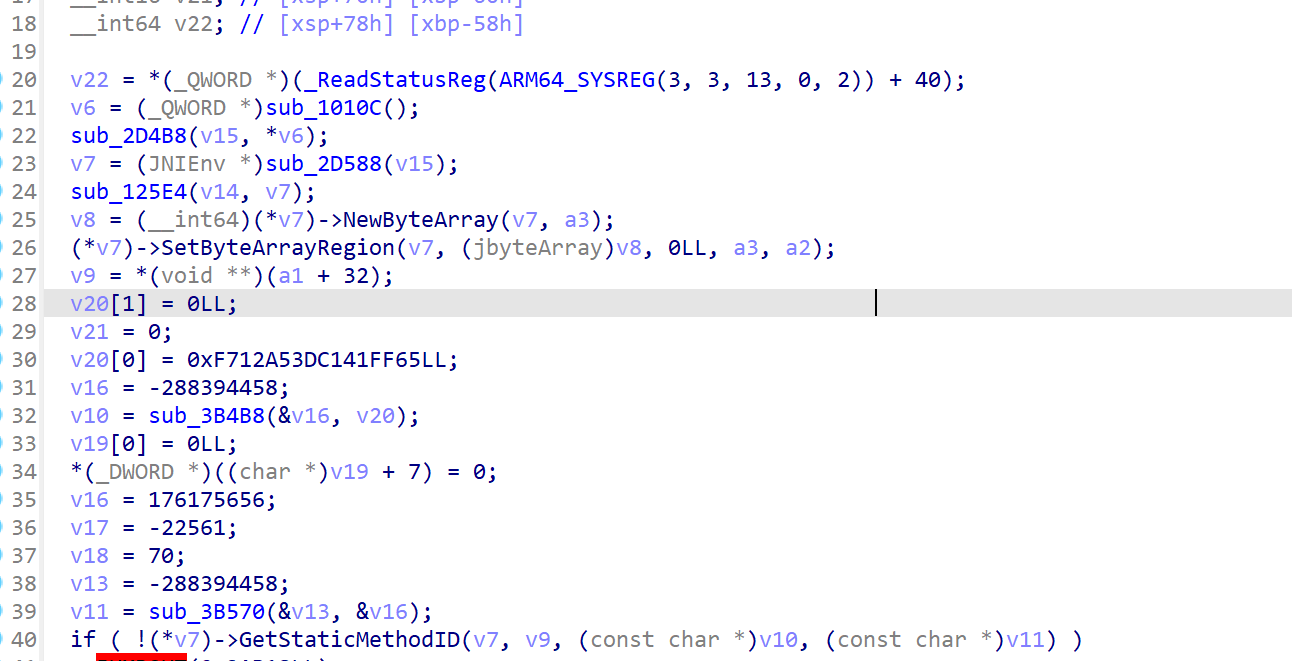
选中变量v7 ->按下快捷Y -> 手动修改为JNIEnv*类型 - > IDA就会将 V7 识别为一个 JNI环境指针
更改后如下:
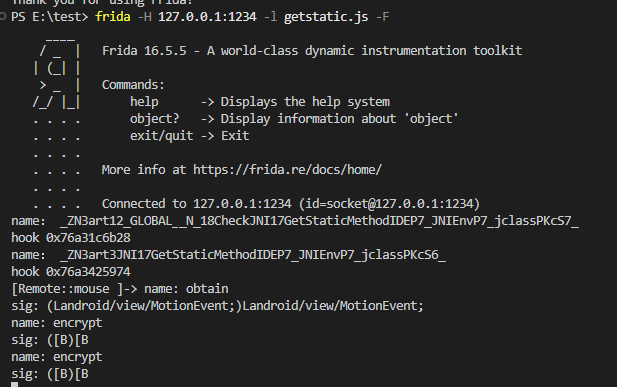
注意到有jni 函数 GetStaticMethodID(获取JAVA类中实例方法的id,以便native层可以调用该实例方法),hook一下,看调用了什么函数
1 2 3 4 5 6 7 8 9 10 11 12 13 14 15 16 17 18 19 20 21 22 23 24 25 //hook GetStaticMethodID function Hook_GetStaticMethodID(){ var symbols = Module.enumerateSymbolsSync("libart.so") // console.log("hook:",symbols) for(var i =0 ;i<symbols.length;i++) { var symbol = symbols[i]; if(symbol.name.indexOf("GetStaticMethodID") != -1) { console.log("name:",symbol.name) console.log("hook",symbol.address) Interceptor.attach(symbol.address,{ onEnter(args){ console.log("name:",args[2].readCString()) console.log("sig:",args[3].readCString()) }, onLeave(retval){ } }) } } } Hook_GetStaticMethodID();
调用了 java 方法:encrypt
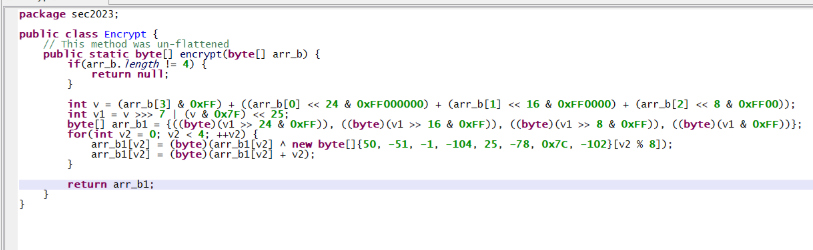
转去 jadx 中搜索,没有结果,应该是dex动态加载的,故使用frida-dexdump 把内存中dex dump下来
dump下来后,把dex拖入jadx中反编译,搜索 encrypt
加了 BlackObfuscator 混淆,直接拖入 jeb5.1 直接去混淆,使控制流平坦化
这样看逻辑就相当清晰了,写脚本
1 2 3 4 5 6 7 8 9 10 11 12 13 14 15 16 17 18 19 20 21 22 23 24 25 26 27 28 29 30 31 32 33 34 35 36 37 38 39 40 41 42 43 44 45 46 47 48 49 50 51 52 53 54 55 56 57 58 59 60 61 62 63 64 import struct #大端序和小端序 #看变量的类型,整数和字节数组 print(hex(int.from_bytes(0xccca946d.to_bytes(4, 'little'),'big'))) def enc_2(input): # input_high = input = 0xccca946d # input_low = input = 0xe3d53939 # 按照大端进行加密 input = int.from_bytes(input.to_bytes(4, 'little'), 'big') # 字节再次翻转 input = (input >> 7 | input << 25) & 0xffffffff # 变成一个可操作的字节序列 input_byte = bytearray(input.to_bytes(4, 'big')) xor_arr = [50, -51, -1, -104, 25, -78, 0x7C, -102] for i in range(4): input_byte[i] = (input_byte[i] ^ xor_arr[i]) & 0xff input_byte[i] = (input_byte[i] + i) & 0xff return int.from_bytes(input_byte, 'big') def dec_2(input): input_byte = bytearray(input.to_bytes(4, 'big')) xor_arr = [50, -51, -1, -104, 25, -78, 0x7C, -102] for i in range(4): input_byte[i] = (input_byte[i] - i) & 0xff input_byte[i] = (input_byte[i] ^ xor_arr[i]) & 0xff input = int.from_bytes(input_byte, 'big') input = (input << 7 | input >> 25) & 0xffffffff input = int.from_bytes(input.to_bytes(4, 'little'), 'big') # 字节再次翻转 return input def mytest_2(): # # 0x6d94cacc 3939d5e3,进入encrypt之前大小端转换了一次 # 把字节流解释成一个64位整数,按照小端的规则拼接 # 先加密高32位逆序字节,再加密低32位逆序字节 # struct.pack(fmt, v1, v2, …) 把数字打包成字节流 # struct.unpack(fmt, bytes) 把字节流打包成数字 data = b'\x6d\x94\xca\xcc\x39\x39\xd5\xe3' input_high,input_low = struct.unpack('<2I',data) # 验证加密算法 input_high = enc_2(input_high) assert input_high.to_bytes(4, 'big') == b'\xaa\x17\xd8\x10' input_low = enc_2(input_low) assert input_low.to_bytes(4, 'big') == b'\xf4\xc0\x8e\x36' # 验证解密算法 input_high = dec_2(input_high) input_low = dec_2(input_low) input = struct.pack('>2I', input_low, input_high) assert input == b'\xe3\xd5\x39\x39\xcc\xca\x94\x6d' mytest_2() # print(int.from_bytes(b'\xe3\xd5\x39\x39\xcc\xca\x94\x6d','little')) # print(int.from_bytes(b'\xe3\xd5\x39\x39\xcc\xca\x94\x6d','big')) # data = b'\x6d\x94\xca\xcc\x39\x39\xd5\xe3' # input_high,input_low = struct.unpack('<2I',data) # print(hex(input_high),hex(input_low))
总体看 sub_3B8CC 看传入的参数和返回的数值:
1 2 3 4 5 6 7 8 9 10 11 12 13 14 function sub_3B8CC(){ var module = Process.getModuleByName("libsec2023.so") var func_addr = module.base.add(0x3b8cc) Interceptor.attach(func_addr,{ onEnter(args){ console.log("参数是:",args[0]) }, onLeave(retval){ console.log("返回值是:",retval) } }) } sub_3B8CC()
第二次加密后得到的值为:0x10d817aa 368ec0f4
正好对应将高低位反转
vm指令加密: 返回 sub_31164 函数,可知经过 sub_3B8CC两个加密后,经过br又发生了跳转
试着在 stalker 中搜一下
可以看到如下跳转
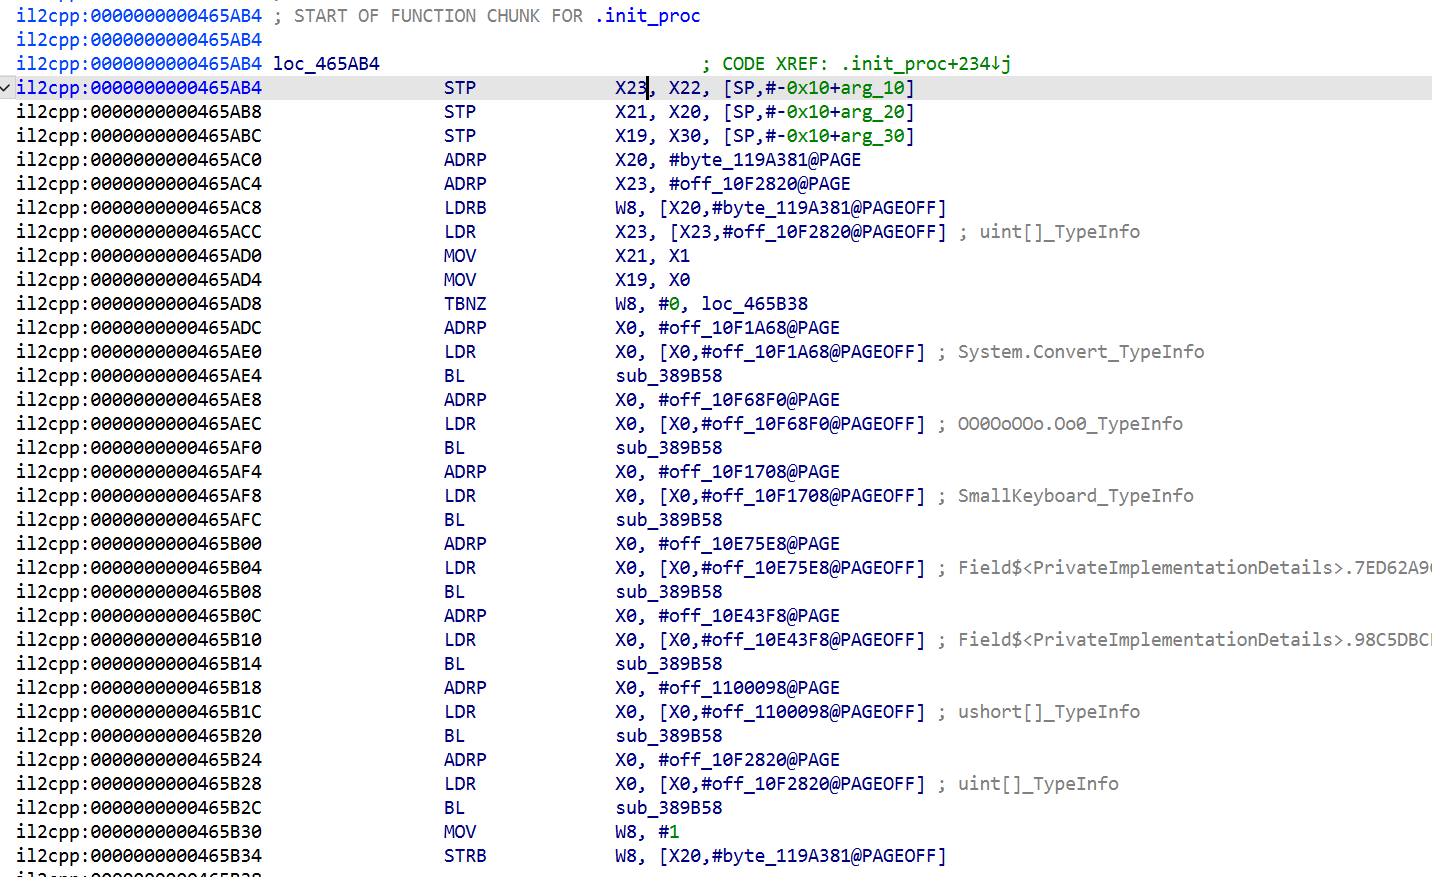
那就回到 libil2cpp.so 的 0x13b8d64 偏移处
经过一个 B 的跳转来到 loc_465AB4,可知该段是 .init_proc 函数 chunk
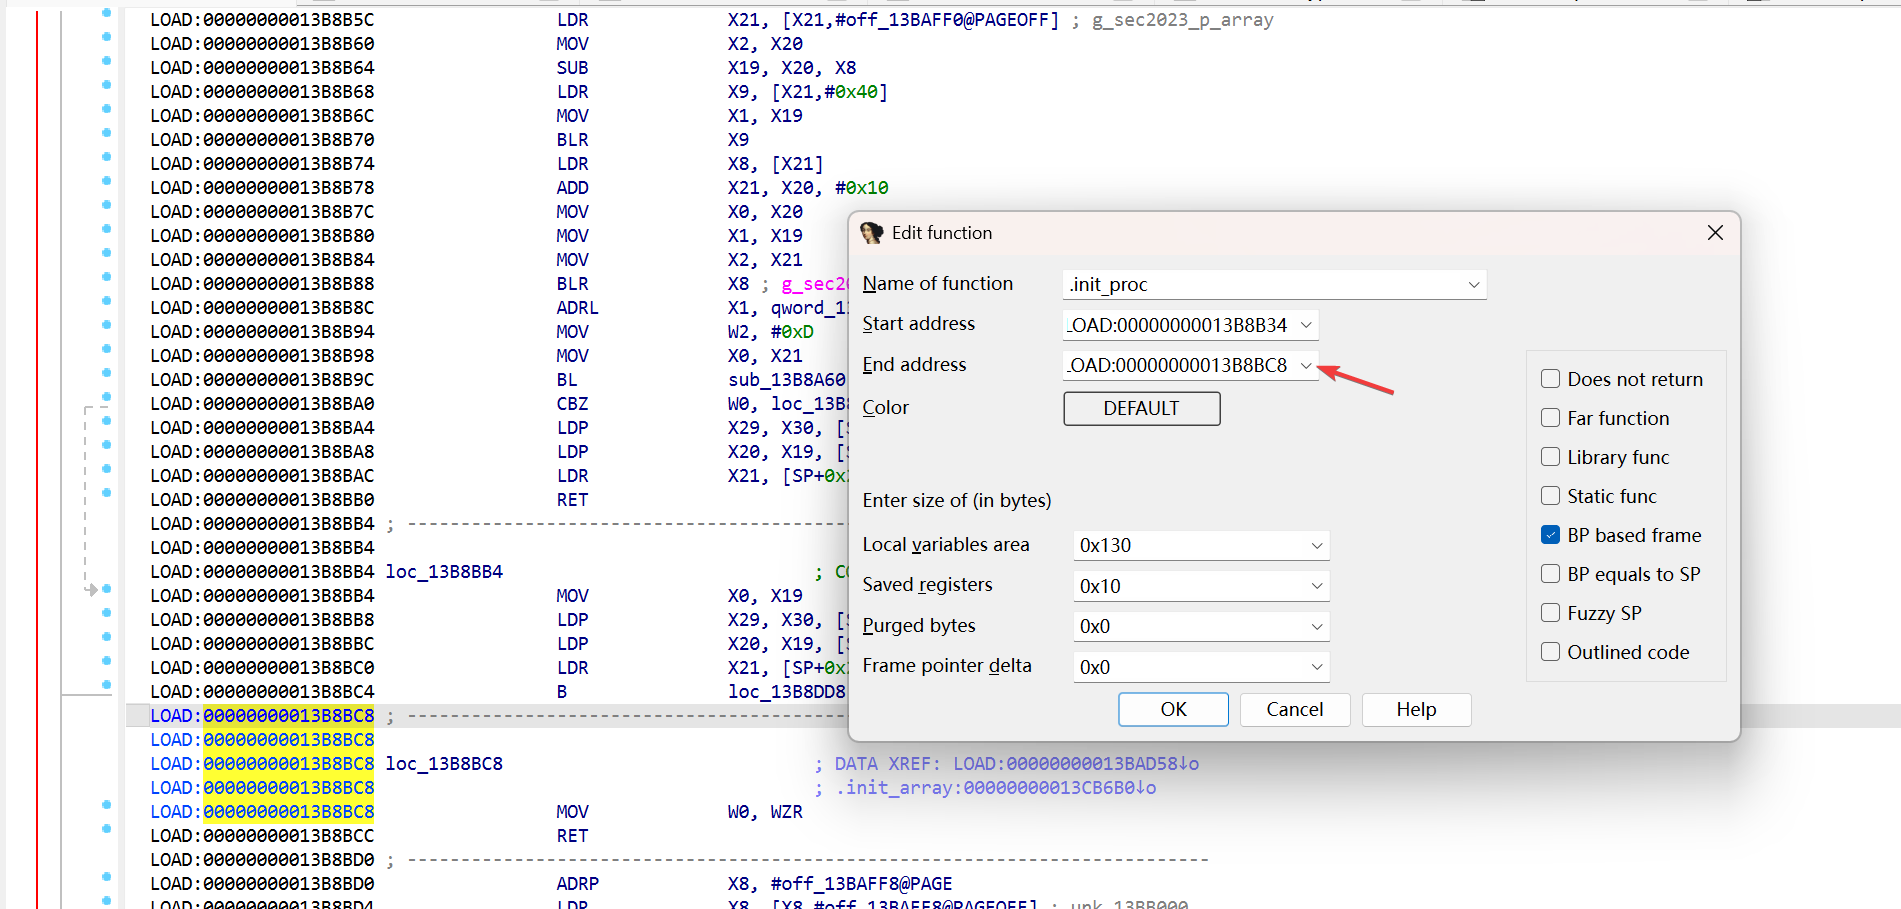
修改一下函数的结尾:
然后就可以继续分析了
libsec.so 中的 br x2 跳转到这里,可以继续分析
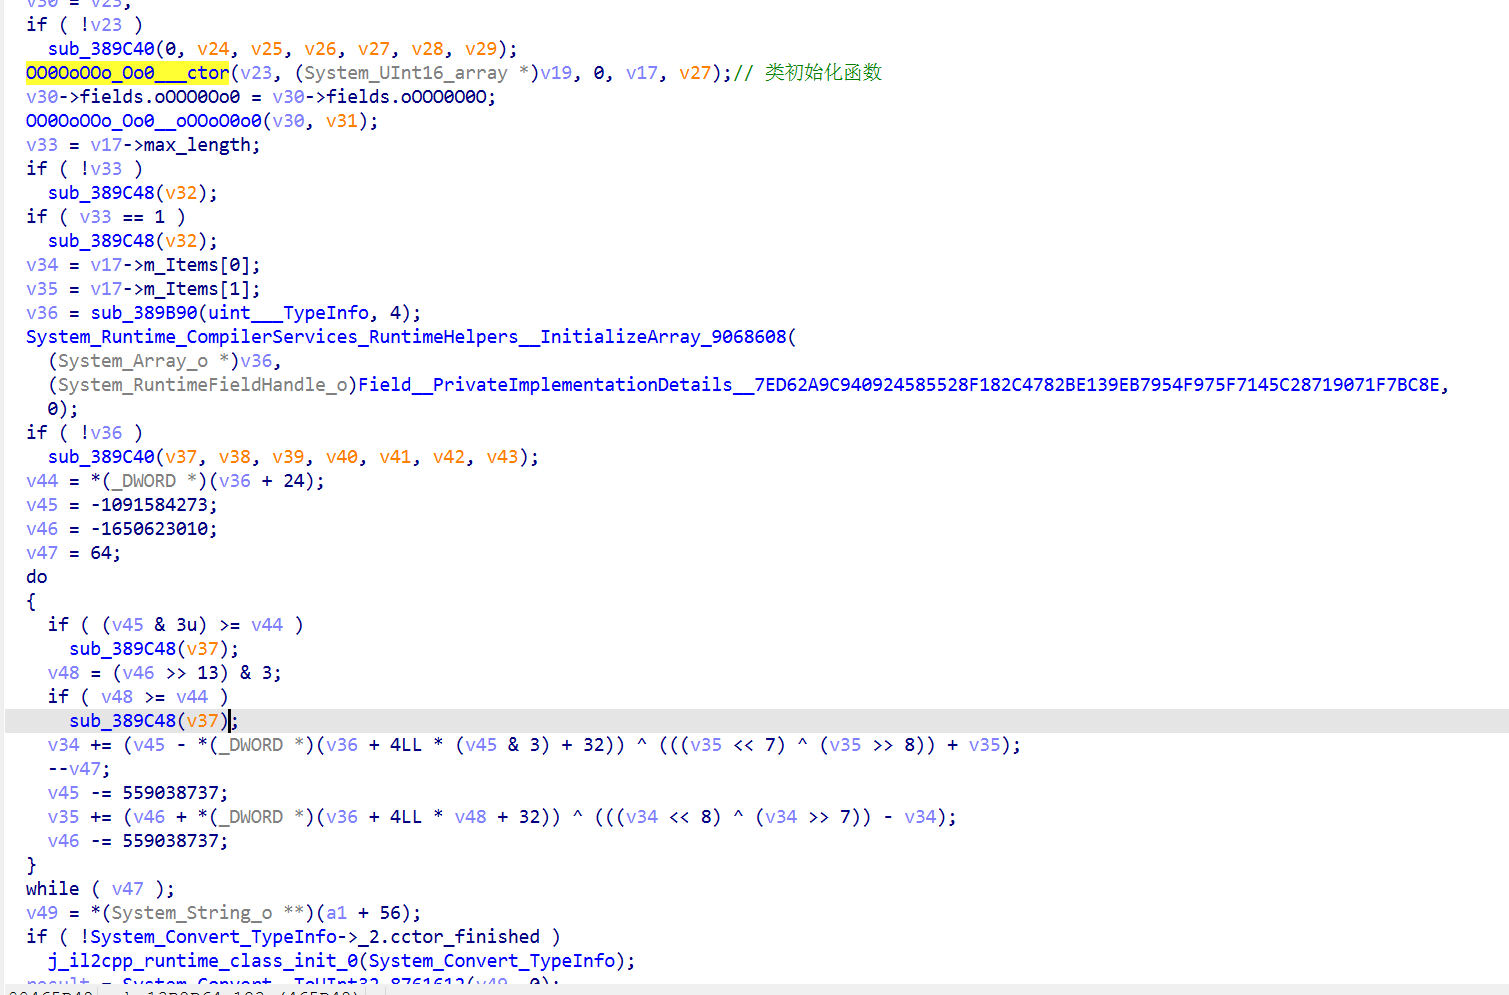
在 c# 中,自己写的普通类,需要用实例变量/方法的需要new(初始化)
c#中一个类的构造函数是 public MyCmlass(){},编译到 IL(中间语言)后,构造名称变成 MyClass::.ctor(),再通过 IL2CPP -> c++ -> so,其中的.ctor 会被转成 MyClass_ctor
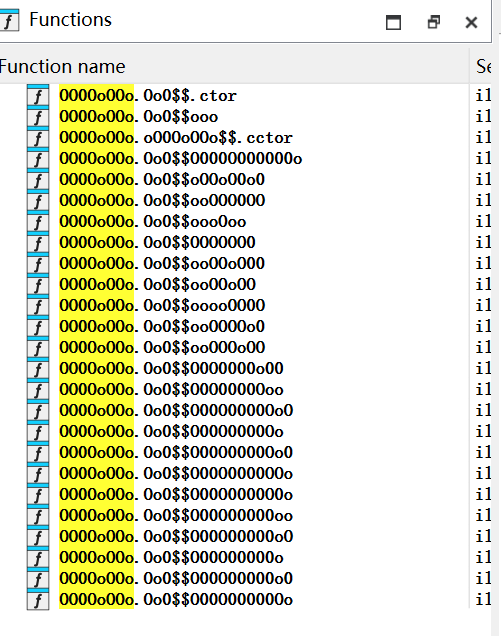
可以看到类名和字段都被混淆
搜索一下该类名
点开几个方法,发现都有MBA表达式
使用工具 GAMBA 简化一下
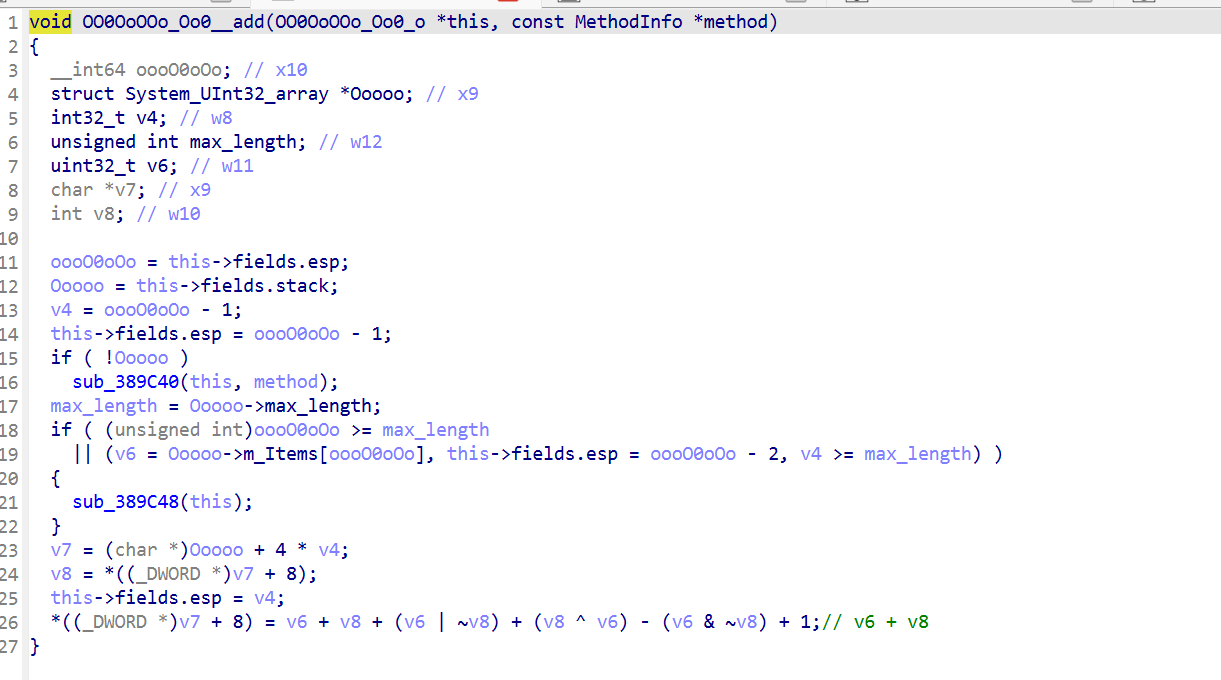
简化后为 v6 + v8,重命名函数名为 add
以此类推
因为4294967296=0x100000000 已经溢出32位了,所以 4294967296+v8=v8
简化后:
这个加密算法应该和VM指令有关
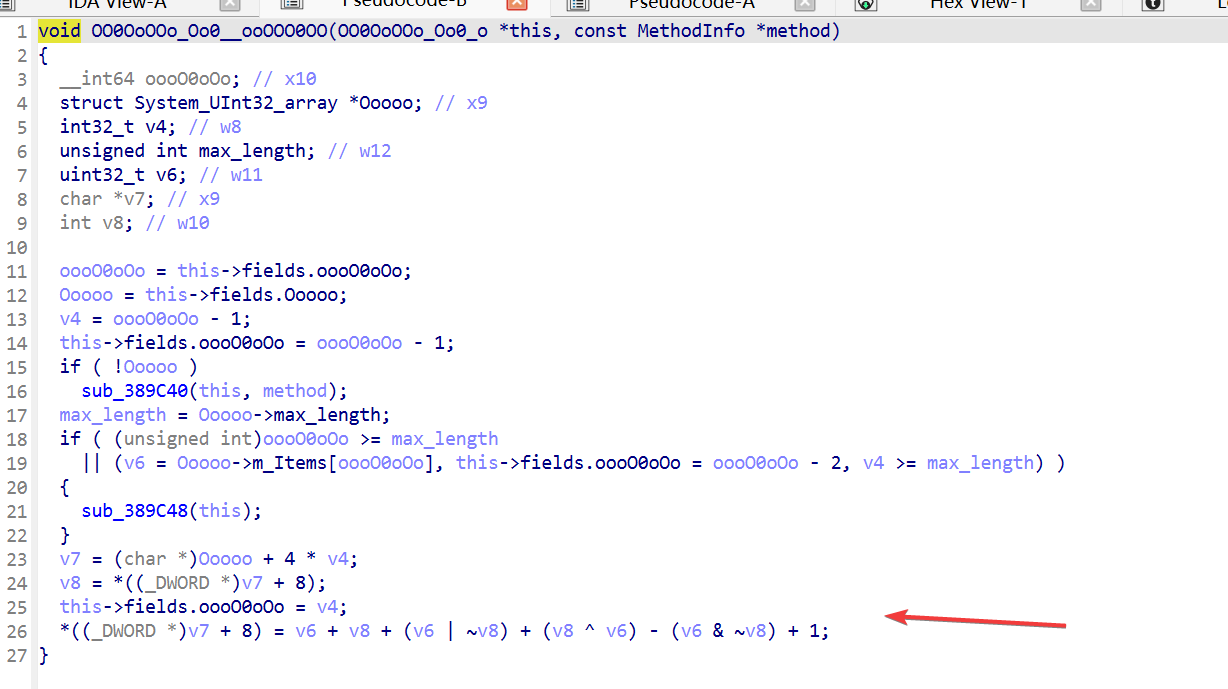
返回x2 寄存器跳转处,往下就调用了改类
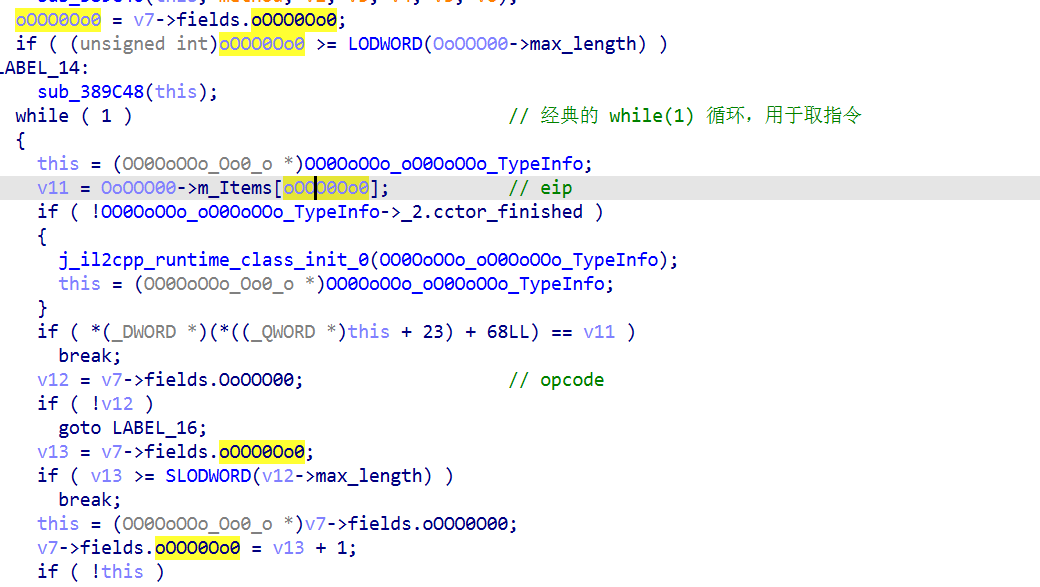
该类中出现了经典的 while(1) 循环,那其中必定有 opcode 和 eip, 只是名称被混淆了
但是eip 常常作为数组下标出现,因此可以区分出 eip和 opcode
重新命名
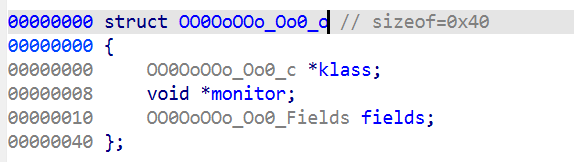
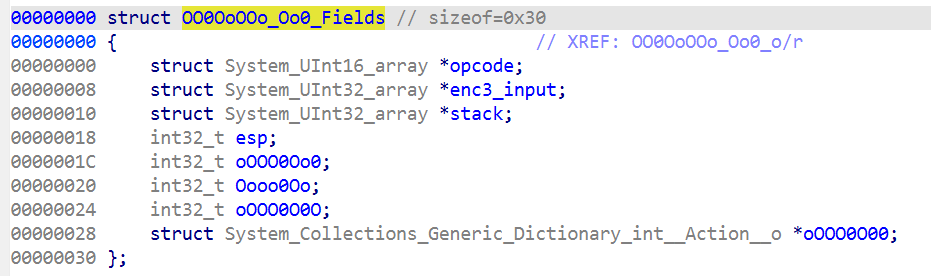
this->fields.OoOOO00; // opcode
this->fields.oOOO0Oo0; // eip
再继续分析其他全局变量:
由于 oooO0oOo 的初始值为 -1,所以 oooO0oOo 为堆栈,而不是数组,esp指向栈顶
这里 OOoOO0 入栈了,故 OOoOO0 为输入值
分析下来全局变量如下:
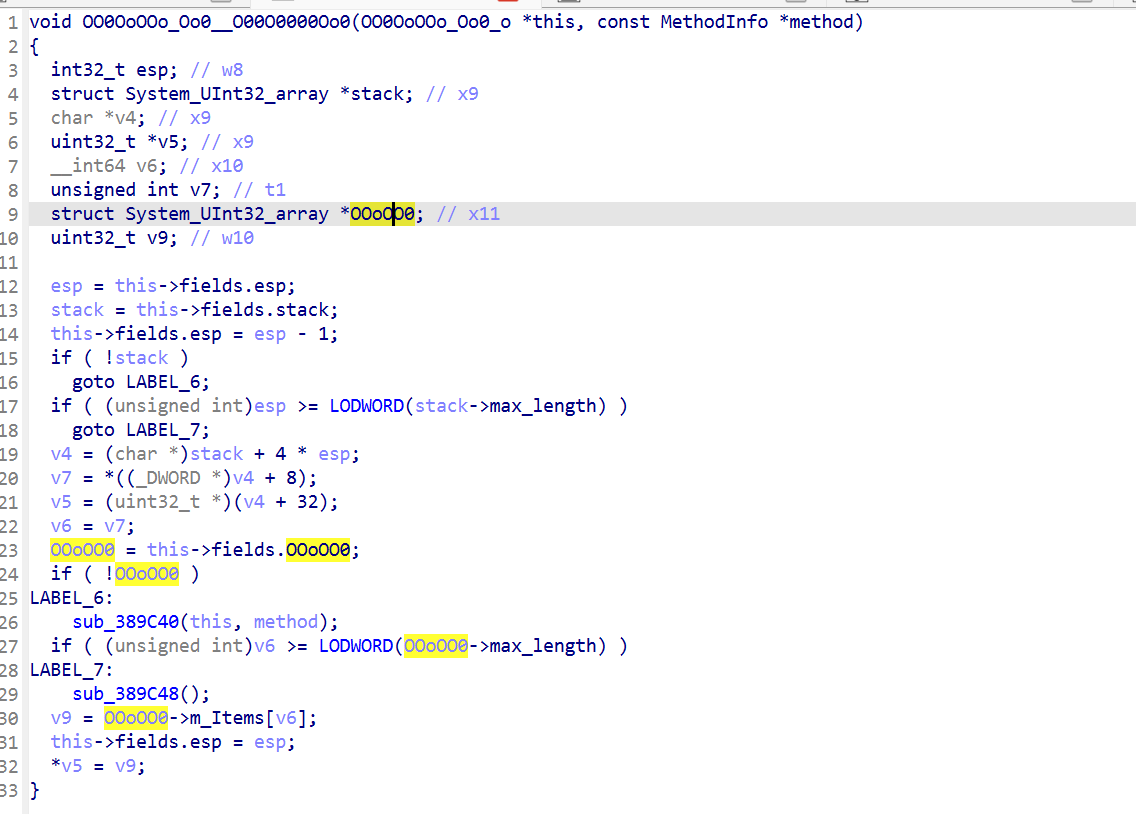
到这里vm 关键变量已经分析的差不多了,点进 add 函数的第一个参数,结构体嵌套结构体
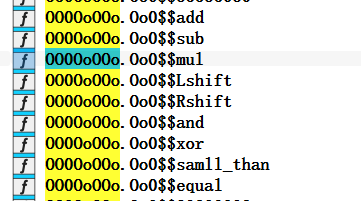
并且已经知道 vm 指令中加减乘除位运算的位置和输入输出是多少,就可以写脚本hook相关vm指令了
1 2 3 4 5 6 7 8 9 10 11 12 13 14 15 16 17 18 19 20 21 22 23 24 25 26 27 28 29 30 31 32 33 34 35 36 37 38 39 40 41 42 43 44 45 46 47 48 49 50 51 52 53 54 55 56 57 58 59 60 61 62 63 64 65 66 67 68 69 70 71 72 73 74 75 76 77 78 79 80 81 82 83 84 85 86 87 88 89 90 91 92 93 94 95 96 97 98 99 100 101 102 103 104 105 106 107 108 109 110 111 112 113 114 115 116 117 118 119 120 121 122 123 124 125 126 127 128 129 130 131 132 133 function hook_vm(){ //先找到该so文件 var moudle = Process.getModuleByName("libil2cpp.so"); var my_base = 0x7e78baa000; var esp,eip,opcode,input,stack,ptr_esp,ptr_eip //加载vm指令处,开始处就是while(1)循环处 var addr_begin = moudle.base.add(0x7E79014D44-my_base) Interceptor.attach(addr_begin,{ onEnter(args){ opcode = ptr(args[0].add(0x10).readS64()).add(0x1C) input = ptr(args[0].add(0x18).readS64()).add(0x1C) stack = ptr(args[0].add(0x20).readS64()).add(0x1C) ptr_esp = args[0].add(0x28) ptr_eip = args[0].add(0x2C) console.log("========start========") for(var i =1;i<8;i++){ console.log("input["+i+"]=0x"+input.add(4*i).readS32().toString(16)) } }, onLeave(retval){ console.log("=========end=========") } }); var addr_add = moudle.base.add(0x7E79014E50-my_base) Interceptor.attach(addr_add,{ onEnter(args){ esp = ptr_esp.readS32() eip = ptr_eip.readS32() //乘4是因为每个元素占4字节,取出esp和esp+1偏移处的内容 console.log("stack["+esp+"]=0x"+stack.add(4*esp).readS32().toString(16)+ "+"+stack.add(4*(esp+1)).readS32()); }, onLeave(retval){ } }) var addr_sub = moudle.base.add(0x7E79014ECC-my_base) Interceptor.attach(addr_sub,{ onEnter(args){ esp = ptr_esp.readS32() eip = ptr_eip.readS32() //乘4是因为每个元素占4字节,取出esp和esp+1偏移处的内容 console.log("stack["+esp+"]=0x"+stack.add(4*esp).readS32().toString(16)+ "-"+stack.add(4*(esp+1)).readS32()); }, onLeave(retval){ } }) var addr_mul = moudle.base.add(0x7E79014F44-my_base) Interceptor.attach(addr_mul,{ onEnter(args){ esp = ptr_esp.readS32() eip = ptr_eip.readS32() //乘4是因为每个元素占4字节,取出esp和esp+1偏移处的内容 console.log("stack["+esp+"]=0x"+stack.add(4*esp).readS32().toString(16)+ "*"+stack.add(4*(esp+1)).readS32()); }, onLeave(retval){ } }) var addr_Lshift = moudle.base.add(0x7E79014FC4-my_base) Interceptor.attach(addr_Lshift,{ onEnter(args){ esp = ptr_esp.readS32() eip = ptr_eip.readS32() //乘4是因为每个元素占4字节,取出esp和esp+1偏移处的内容 console.log("stack["+esp+"]=0x"+stack.add(4*esp).readS32().toString(16)+ "<<"+stack.add(4*(esp+1)).readS32()); }, onLeave(retval){ } }) var addr_Rshift = moudle.base.add(0x7E79015040-my_base) Interceptor.attach(addr_Rshift,{ onEnter(args){ esp = ptr_esp.readS32() eip = ptr_eip.readS32() //乘4是因为每个元素占4字节,取出esp和esp+1偏移处的内容 console.log("stack["+esp+"]=0x"+stack.add(4*esp).readS32().toString(16)+ ">>"+stack.add(4*(esp+1)).readS32()); }, onLeave(retval){ } }) var addr_and = moudle.base.add(0x7E790150BC-my_base) Interceptor.attach(addr_and,{ onEnter(args){ esp = ptr_esp.readS32() eip = ptr_eip.readS32() //乘4是因为每个元素占4字节,取出esp和esp+1偏移处的内容 console.log("stack["+esp+"]=0x"+stack.add(4*esp).readS32().toString(16)+ "&"+stack.add(4*(esp+1)).readS32()); }, onLeave(retval){ } }) var addr_xor = moudle.base.add(0x7E7901513C-my_base) Interceptor.attach(addr_xor,{ onEnter(args){ esp = ptr_esp.readS32() eip = ptr_eip.readS32() //乘4是因为每个元素占4字节,取出esp和esp+1偏移处的内容 console.log("stack["+esp+"]=0x"+stack.add(4*esp).readS32().toString(16)+ "^"+stack.add(4*(esp+1)).readS32()); }, onLeave(retval){ } }) } hook_vm();
输出如下:
1 2 3 4 5 6 7 8 9 10 11 12 13 14 15 16 17 18 19 20 21 22 23 24 25 26 27 28 29 30 31 32 33 34 35 36 37 38 39 40 41 42 43 44 45 46 47 48 49 50 51 52 53 54 55 56 57 58 59 60 61 62 63 64 65 66 67 68 69 70 71 72 73 74 75 76 77 78 79 80 81 82 83 84 85 86 87 88 89 90 91 92 93 94 95 ========start======== input[1]=0x10d817aa //输入值的低32位 input[2]=0x368ec0f4 //输入值的高32位 stack[1]=0x10d817aa>>24 stack[1]=0x10&255 //取出第4个字节 记为byte4 = 0x10 stack[2]=0x18-8 stack[2]=0x10d817aa>>16 stack[2]=0x10d8&255 //取出第3个字节 记为byte3 = 0xd8 stack[3]=0x10-8 stack[3]=0x10d817aa>>8 //取出第2个字节 记为byte2 = 0x17 stack[3]=0x10d817&255 stack[4]=0x8-8 stack[4]=0x10d817aa>>0 stack[4]=0x10d817aa&255 //取出第1个字节 记为byte1 = 0xaa stack[5]=0x0-8 stack[4]=0xaa-27 // byte1 = byte1 -27(0x1B)=0x8f stack[3]=0x17^194 // byte2 = byte2 ^ 194(0xC2) = 0xD5 stack[2]=0xd8+168 // byte3 = byte3 + 168(0xA8) = 0x180 stack[1]=0x10^54 // byte4 = byte4 ^ 54(0x36) = 0x26 stack[1]=0x8f^0 // byte1 ^ 0 stack[1]=0x8f<<0 //byte1 << 0 stack[2]=0xff<<0 stack[1]=0x8f&255 stack[1]=0x8f+0 stack[1]=0x4+1 stack[1]=0x0+8 stack[1]=0xd5^8 //byte2 = byte2^8 = 0xDD stack[1]=0xdd<<8 //byte2 << 8 = 0xDD00 stack[2]=0xff<<8 stack[1]=0xdd00&65280 //byte2 = byte2 & 65280 = 0xdd00 stack[1]=0xdd00+143 //byte2 = byte2 + 143 = 0x8F stack[1]=0x5+1 stack[1]=0x8+8 stack[1]=0x180^16 //byte3 = byte3 ^ 16 = 0x190 stack[1]=0x190<<16 //byte3 = byte3 << 16 = 0xBE000 stack[2]=0xff<<16 stack[1]=0x1900000&16711680 stack[1]=0x900000+56719 stack[1]=0x6+1 stack[1]=0x10+8 stack[1]=0x26^24 //byte4 = byte4 ^ 24 = 0x3e stack[1]=0x3e<<24 //byte4 = byte4 << 24 = 0x3E000000 stack[2]=0xff<<24 stack[1]=0x3e000000&-16777216 stack[1]=0x3e000000+9493903 //byte4 = byte4 + 9492903 = 0x3E90DD8F //高32位加密 stack[1]=0x7+1 stack[1]=0x18+8 stack[1]=0x368ec0f4>>24 //byte4 = 0x36 stack[1]=0x36&255 stack[2]=0x18-8 stack[2]=0x368ec0f4>>16 //byte3 = 0x8e stack[2]=0x368e&255 stack[3]=0x10-8 stack[3]=0x368ec0f4>>8 //byte2 = 0xc0 stack[3]=0x368ec0&255 stack[4]=0x8-8 stack[4]=0x368ec0f4>>0 //byte1 = 0xf4 stack[4]=0x368ec0f4&255 stack[5]=0x0-8 stack[4]=0xf4-47 //byte1 = byte1 - 47 = 0xc5 stack[3]=0xc0^182 //byte2 = byte2 ^ 182 = 0x76 stack[2]=0x8e+55 //byte3 = byte3 + 55 = 0xc5 stack[1]=0x36^152 //byte4 = byte4 ^ 152 = 0xAE stack[1]=0xc5+0 //byte1 +0 stack[1]=0xc5<<0 // byte1 <<0 stack[2]=0xff<<0 stack[1]=0xc5&255 stack[1]=0xc5+0 stack[1]=0x4+1 stack[1]=0x0+8 stack[1]=0x76+8 //byte2 = byte2+8 = 0x7E stack[1]=0x7e<<8 //byte2 = byte2 << 8 = 0x7E00 stack[2]=0xff<<8 stack[1]=0x7e00&65280 stack[1]=0x7e00+197 //byte2 = byte2 +197 = 0x7EC5 stack[1]=0x5+1 stack[1]=0x8+8 stack[1]=0xc5+16 //byte3 +16 stack[1]=0xd5<<16 //byte3 <<16 stack[2]=0xff<<16 stack[1]=0xd50000&16711680 stack[1]=0xd50000+32453 stack[1]=0x6+1 stack[1]=0x10+8 stack[1]=0xae+24 //byte4 +24 stack[1]=0xc6<<24 //byte4 <<24 stack[2]=0xff<<24 stack[1]=0x-3a000000&-16777216 stack[1]=0x-3a000000+13991621 stack[1]=0x7+1 stack[1]=0x18+8 =========end=========
逻辑很清晰,写解密脚本
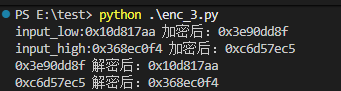
1 2 3 4 5 6 7 8 9 10 11 12 13 14 15 16 17 18 19 20 21 22 23 24 25 26 27 28 29 30 31 32 33 34 35 36 37 38 39 40 41 42 43 44 45 46 47 48 49 50 51 52 53 54 55 56 57 58 59 60 61 62 63 64 65 66 import struct def enc_vm_low(input): # 按照大端序解包4个字节 byte4,byte3,byte2,byte1 = struct.unpack(">4B",input.to_bytes(4,'big')) # 0x10d817aa 从左到右分别是byte4,byte3,byte2,byte1 byte1 = (byte1 - 27) ^ 0 byte2 = (byte2 ^ 194) ^ 8 byte3 = (byte3 + 168) ^ 16 byte4 = (byte4 ^ 54) ^ 24 # print("byte4:"+hex(byte4)+" byte3:"+hex(byte3)+" byte2:"+hex(byte2)+" byte1:"+hex(byte1)) #小端序列打包4个字节 input = struct.pack("<4B",byte1 & 0xff,byte2 & 0xff,byte3 & 0xff,byte4 & 0xff) return int.from_bytes(input,'little') #print(hex(enc_vm_low(int.from_bytes(b'\x10\xd8\x17\xaa','big')))) def dec_vm_low(input): # 按照大端序解包4个字节 byte4,byte3,byte2,byte1 = struct.unpack(">4B",input.to_bytes(4,'big')) byte1 = (byte1 ^ 0) + 27 byte2 = (byte2 ^ 8)^ 194 byte3 = (byte3 ^ 16)- 168 byte4 = (byte4 ^ 24)^ 54 input = struct.pack("<4B",byte1 & 0xff,byte2 & 0xff,byte3 & 0xff,byte4 & 0xff) return int.from_bytes(input,"little") def enc_vm_high(input): # 按照大端序解包4个字节 byte4,byte3,byte2,byte1 = struct.unpack(">4B",input.to_bytes(4,'big')) byte1 = (byte1 -47) + 0 byte2 = (byte2 ^ 182) + 8 byte3 = (byte3 + 55) + 16 byte4 = (byte4 ^ 152) + 24 input = struct.pack("<4B",byte1 & 0xff,byte2 & 0xff,byte3 & 0xff,byte4 & 0xff) return int.from_bytes(input,"little") def dec_vm_high(input): # 按照大端序解包4个字节 byte4,byte3,byte2,byte1 = struct.unpack(">4B",input.to_bytes(4,'big')) byte1 = (byte1 -0) + 47 byte2 = (byte2 -8) ^ 182 byte3 = (byte3 -16 ) - 55 byte4 = (byte4 -24) ^ 152 input = struct.pack("<4B",byte1 & 0xff,byte2 & 0xff,byte3 & 0xff,byte4 & 0xff) return int.from_bytes(input,"little") def test(): # 由第二个加密点传过来的值为:0x368ec0f4 10d817aa input_high = int.from_bytes(b'\x36\x8e\xc0\xf4','big') input_low = int.from_bytes(b'\x10\xd8\x17\xaa','big') input_low = enc_vm_low(input_low) input_high = enc_vm_high(input_high) print("input_low:0x10d817aa 加密后:"+hex(input_low)) print("input_high:0x368ec0f4 加密后:"+hex(input_high)) #验证解密算法 input_low = dec_vm_low(input_low) input_high = dec_vm_high(input_high) print("0x3e90dd8f 解密后:"+hex(input_low)) print("0xc6d57ec5 解密后:"+hex(input_high)) test()
进行加密的数值正好对应第二次加密后得到的数值
第三处加密就结束了
XTEA 回到 libsec.so br x2跳转来到的函数继续往下分析
很明显的 XTEA加密
逻辑比较清晰,只是密钥未知
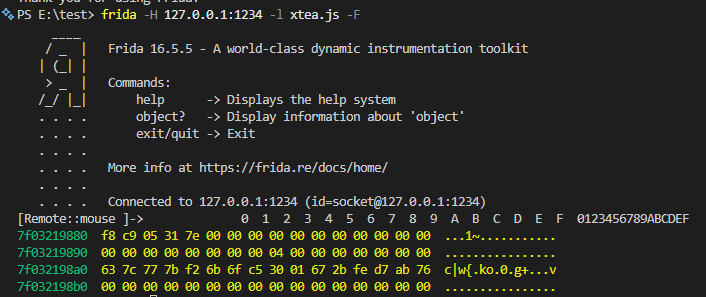
使用frida 将 密钥v36 hook下来
1 2 3 4 5 6 7 8 9 10 11 12 13 14 15 16 17 18 19 20 function hook_x20(){ var module = Process.getModuleByName("libil2cpp.so") var my_base = 0x7e78baa000 var addr = module.base.add(0x7E7900FC60 - my_base) Interceptor.attach(addr,{ onEnter(args){ console.log(hexdump(this.context.x20,{ offset: 0, length: 64, header: true, ansi: true })); }, onLeave(retval){ } }) } hook_x20()
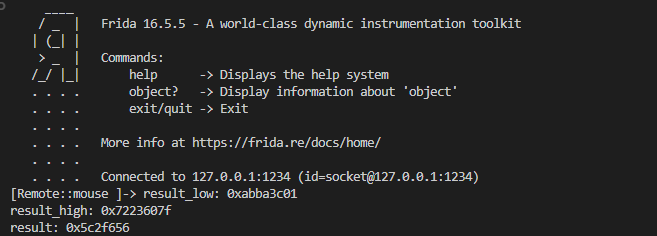
并且把加密后的值 hook下来
1 2 3 4 5 6 7 8 9 10 11 12 13 14 15 16 17 function hook_xtea(){ var module = Process.getModuleByName("libil2cpp.so") var my_base = 0x7e78baa000 var addr = module.base.add(0x7E7900FD14 - my_base) Interceptor.attach(addr,{ onEnter(args){ console.log("result_low:",this.context.x21); console.log("result_high:",this.context.x22); console.log("result:",this.context.x0); }, onLeave(retval){ } }) } hook_xtea()
写 xtea 的解密脚本:
1 2 3 4 5 6 7 8 9 10 11 12 13 14 15 16 17 18 19 20 21 22 23 24 25 26 27 28 29 30 31 32 33 34 35 36 37 38 39 40 41 42 43 44 import ctypes def enc_xtea(input_low,input_high): # tea系列的每个值都必须是32位无符号整数 v0,v1 = ctypes.c_uint32(input_low),ctypes.c_uint32(input_high) # ctypes.c_uint32 不是普通数字,它是一个结构体对象,它内部有个 .value 才是真正的 32-bit 整数。 key = [0x7b777c63,0xc56f6bf2,0x2b670130,0x76abd7fe] delta = 0x21524111 total1 = ctypes.c_uint32(0xBEEFBEEF) total2 = ctypes.c_uint32(0x9D9D7DDE) for i in range(64): v0.value += (((v1.value << 7) ^ (v1.value >> 8)) + v1.value) ^ (total1.value - key[total1.value & 3]) total1.value -= delta v1.value += (((v0.value << 8) ^ (v0.value >> 7)) - v0.value) ^ (total2.value + key[(total2.value >> 13) & 3]) total2.value -= delta return v0.value ,v1.value def dec_xtea(input_low,input_high): v0,v1 = ctypes.c_uint32(input_low),ctypes.c_uint32(input_high) key = [0x7b777c63,0xc56f6bf2,0x2b670130,0x76abd7fe] delta = 0x21524111 total1 = ctypes.c_uint32(0xBEEFBEEF - 64 * delta) total2 = ctypes.c_uint32(0x9D9D7DDE - 64 * delta) for i in range(64): total2.value += delta v1.value -= (((v0.value << 8) ^ (v0.value >> 7)) - v0.value) ^ (total2.value + key[(total2.value >> 13) & 3]) total1.value += delta v0.value -= (((v1.value << 7) ^ (v1.value >> 8)) + v1.value) ^ (total1.value - key[total1.value & 3]) return v0.value ,v1.value def test(): input_low = 0x3e90dd8f input_high = 0xc6d57ec5 #验证解密算法 input_low,input_high = enc_xtea(input_low,input_high) assert(input_low,input_high) == (0xabba3c01,0x7223607f) #验证加密算法 input_low,input_high = dec_xtea(input_low,input_high) assert(input_low,input_high) == (0x3e90dd8f,0xc6d57ec5) test()
至此四处加密都分析完了
注册机 1 2 3 4 5 6 7 8 9 10 11 12 13 14 15 16 17 18 19 20 21 22 23 24 25 26 27 28 29 30 31 32 33 34 35 36 37 38 39 40 41 42 43 44 45 46 47 48 49 50 51 52 53 54 55 56 57 58 59 60 61 62 63 64 65 66 67 68 69 70 71 72 73 74 75 76 77 78 79 80 81 82 83 84 85 86 87 88 89 90 91 92 93 94 95 96 97 98 99 100 101 102 103 import struct import ctypes algorithm_1={ (0,"enc") :lambda x: (x-28) & 0xff, # 防止溢出或负数, 确保结果在 0~255 之间 (1,"enc") :lambda x: (x^0xD3), (2,"enc") :lambda x: (x-94) & 0xff, (3,"enc") :lambda x: (x^0x86), (0,"dec") :lambda x: (x+28) & 0xff, (1,"dec") :lambda x: (x^0xD3), (2,"dec") :lambda x: (x+94) & 0xff, (3,"dec") :lambda x: (x^0x86) } # 加密点4,xtea def dec_xtea(input_low,input_high): v0,v1 = ctypes.c_uint32(input_low),ctypes.c_uint32(input_high) key = [0x7b777c63,0xc56f6bf2,0x2b670130,0x76abd7fe] delta = 0x21524111 total1 = ctypes.c_uint32(0xBEEFBEEF - 64 * delta) total2 = ctypes.c_uint32(0x9D9D7DDE - 64 * delta) for i in range(64): total2.value += delta v1.value -= (((v0.value << 8) ^ (v0.value >> 7)) - v0.value) ^ (total2.value + key[(total2.value >> 13) & 3]) total1.value += delta v0.value -= (((v1.value << 7) ^ (v1.value >> 8)) + v1.value) ^ (total1.value - key[total1.value & 3]) return v0.value ,v1.value # 加密点3,vm def dec_vm_low(input): # 按照大端序解包4个字节 byte4,byte3,byte2,byte1 = struct.unpack(">4B",input.to_bytes(4,'big')) byte1 = (byte1 ^ 0) + 27 byte2 = (byte2 ^ 8)^ 194 byte3 = (byte3 ^ 16)- 168 byte4 = (byte4 ^ 24)^ 54 input = struct.pack("<4B",byte1 & 0xff,byte2 & 0xff,byte3 & 0xff,byte4 & 0xff) return int.from_bytes(input,"little") def dec_vm_high(input): # 按照大端序解包4个字节 byte4,byte3,byte2,byte1 = struct.unpack(">4B",input.to_bytes(4,'big')) byte1 = (byte1 -0) + 47 byte2 = (byte2 -8) ^ 182 byte3 = (byte3 -16 ) - 55 byte4 = (byte4 -24) ^ 152 input = struct.pack("<4B",byte1 & 0xff,byte2 & 0xff,byte3 & 0xff,byte4 & 0xff) return int.from_bytes(input,"little") # 加密点2 blackObfuscator def dec_2(input): input_byte = bytearray(input.to_bytes(4, 'big')) xor_arr = [50, -51, -1, -104, 25, -78, 0x7C, -102] for i in range(4): input_byte[i] = (input_byte[i] - i) & 0xff input_byte[i] = (input_byte[i] ^ xor_arr[i]) & 0xff input = int.from_bytes(input_byte, 'big') input = (input << 7 | input >> 25) & 0xffffffff input = int.from_bytes(input.to_bytes(4, 'little'), 'big') # 字节再次翻转 return input #加密点1 花指令 def dec_1(input): input_bytes = bytearray(input.to_bytes(8,'little')) dec_array = [0] * len(input_bytes) for i in range(len(input_bytes)): index = i % 4 dec_array[i] = (algorithm_1[(index,"dec")]((input_bytes[i] + 8*index)&0xff) ^ index) return int.from_bytes(bytearray(dec_array),'little') token = int(input("enter the token plz~:")) input_low,input_high = token,0 # xtea input_low,input_high = dec_xtea(input_low,input_high) #vm input_low,input_high = dec_vm_low(input_low),dec_vm_high(input_high) # bswap32 ,字节序列完全反转 # 把 input_low 和 input_high 以“小端格式”写进字节数组, 返回一个 8 字节的 bytes 对象,字节数组 input = struct.pack("<2I",input_low,input_high) # 把 8 字节(bytes)重新“读出”为两个 32bit 整数 input_low,input_high = struct.unpack(">2I",input) # 高低位相互转换 input_low,input_high = input_high,input_low # blackObfuscator input_low = dec_2(input_low) input_high = dec_2(input_high) # 花指令 input= struct.pack('>2I',input_low,input_high) input=int.from_bytes(input,'little') input = dec_1(input) print(input)
输入token后,即可生成激活外挂的密钥